> ## Documentation Index
> Fetch the complete documentation index at: https://support.entegrata.com/llms.txt
> Use this file to discover all available pages before exploring further.
# Firewall Rules
> Configure and manage firewall rules to control network access for your Entegrata instance
## Overview
Firewall rules control which external services and resources your Entegrata instance can communicate with. Rules are organized by data source — making it easy to see exactly which policies apply to each integration — and by system-level rules for infrastructure-wide access.
This is a critical security feature that:
* Restricts outbound connections to only approved destinations
* Prevents unauthorized data exfiltration
* Ensures compliance with security policies
* Enables safe communication with data sources and third-party services
Firewall rules complement your network connection settings (S2S VPN or VNet Peering) by controlling what your Entegrata instance can access once connected to your infrastructure.
## Navigating Firewall Settings
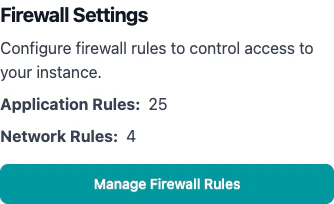
To access firewall settings, navigate to **Instance Settings** and click **Manage Firewall Rules** on the Firewall Settings card. The card displays a summary of your current application and network rule counts.
 The firewall management interface is organized into two tabs:
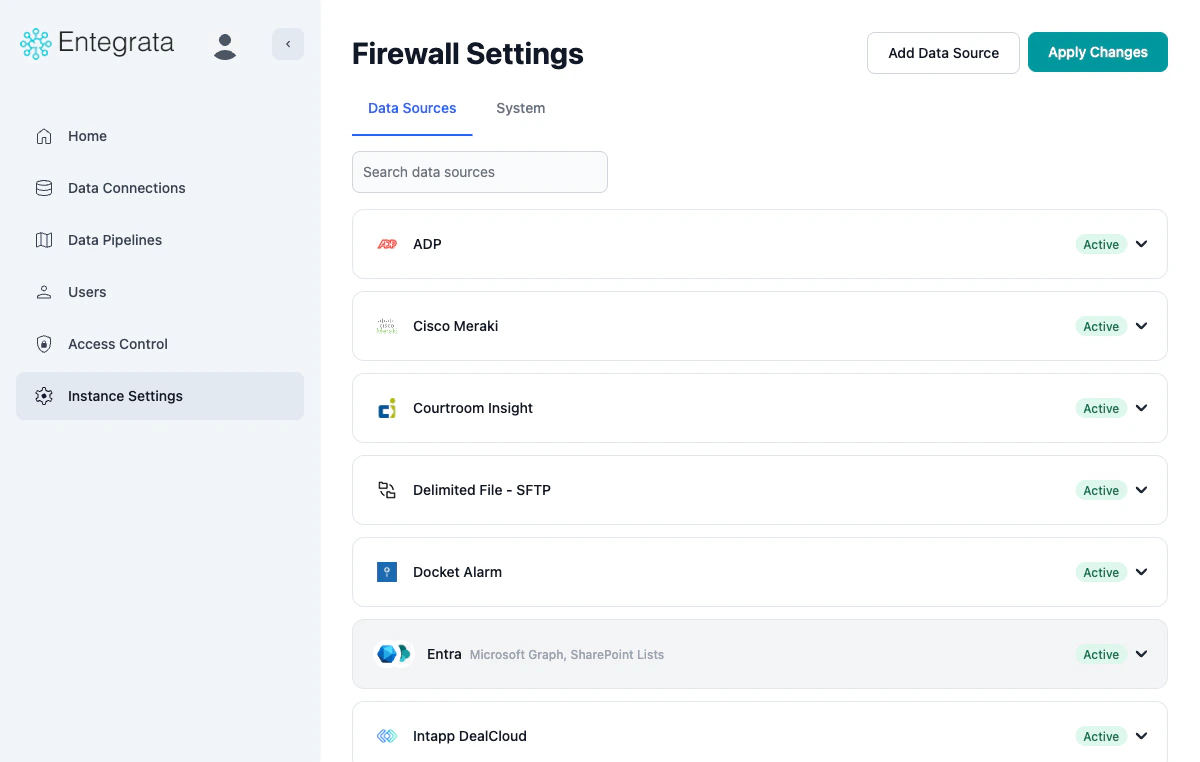 Lists all data sources that have firewall policies configured. Each data source appears as an expandable card showing:
* **Data source icon and name** — identifies the integration
* **Status badge** — **Active** (at least one policy configured) or **Inactive** (no policies yet)
* **Expand/collapse arrow** — click to view individual policies
Use the **Search data sources** field at the top to quickly filter the list.
Contains system-level firewall rules that apply to your Entegrata infrastructure rather than a specific data source. These include rules for services like Microsoft Fabric and other platform-wide dependencies.
## Understanding Firewall Policies
### Policy Types
Each firewall policy is one of two types:
**What they are**: Domain-based policies that match Fully Qualified Domain Names (FQDNs)
**Use cases**:
* Cloud APIs (e.g., `api.example.com`)
* SaaS platforms (e.g., `app.salesforce.com`)
* Services with dynamic IPs
**Supported formats**:
* Exact domains: `api.example.com`
* Wildcard subdomains: `*.example.com`
Wildcard rules like `*.com` are not allowed. The wildcard can only replace one subdomain level, e.g., `*.example.com`.
**What they are**: IP address-based policies for specific network destinations
**Use cases**:
* On-premises servers with static IPs
* Internal network resources
* Database servers without domain names
**Supported formats**:
* Individual IPs: `192.168.1.100`
* CIDR ranges: `10.0.0.0/24`
* Single IP as CIDR: `203.0.113.50/32`
If you enter an IP without a CIDR suffix (e.g., `192.168.1.100`), the system automatically treats it as `/32` (single IP).
### Policy Display
When you expand a data source or view the System tab, each policy row shows:
Lists all data sources that have firewall policies configured. Each data source appears as an expandable card showing:
* **Data source icon and name** — identifies the integration
* **Status badge** — **Active** (at least one policy configured) or **Inactive** (no policies yet)
* **Expand/collapse arrow** — click to view individual policies
Use the **Search data sources** field at the top to quickly filter the list.
Contains system-level firewall rules that apply to your Entegrata infrastructure rather than a specific data source. These include rules for services like Microsoft Fabric and other platform-wide dependencies.
## Understanding Firewall Policies
### Policy Types
Each firewall policy is one of two types:
**What they are**: Domain-based policies that match Fully Qualified Domain Names (FQDNs)
**Use cases**:
* Cloud APIs (e.g., `api.example.com`)
* SaaS platforms (e.g., `app.salesforce.com`)
* Services with dynamic IPs
**Supported formats**:
* Exact domains: `api.example.com`
* Wildcard subdomains: `*.example.com`
Wildcard rules like `*.com` are not allowed. The wildcard can only replace one subdomain level, e.g., `*.example.com`.
**What they are**: IP address-based policies for specific network destinations
**Use cases**:
* On-premises servers with static IPs
* Internal network resources
* Database servers without domain names
**Supported formats**:
* Individual IPs: `192.168.1.100`
* CIDR ranges: `10.0.0.0/24`
* Single IP as CIDR: `203.0.113.50/32`
If you enter an IP without a CIDR suffix (e.g., `192.168.1.100`), the system automatically treats it as `/32` (single IP).
### Policy Display
When you expand a data source or view the System tab, each policy row shows:
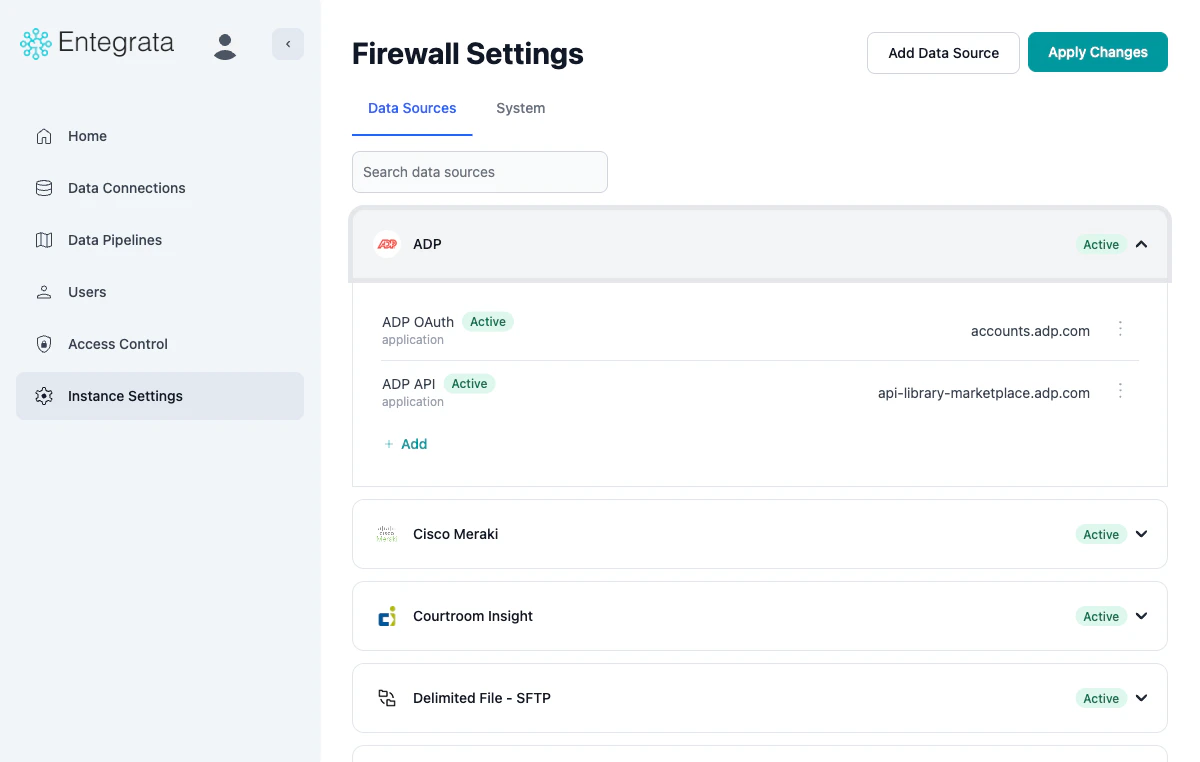 A descriptive label for the policy (e.g., "ADP OAuth", "Database Server", "Fabric").
Shows the current state of the policy:
* **Pending** — The policy has been saved but not yet deployed. It will become active after you click **Apply Changes** and the infrastructure transition completes.
* **Active** — The policy is deployed and enforced on your infrastructure.
Shows **application** (FQDN-based) or **network** (IP/CIDR-based).
The FQDN or IP address/CIDR range (e.g., `accounts.adp.com`, `1.2.3.4/32`).
A three-dot menu with **Edit** and **Delete** options.
## Adding a Data Source
Use this workflow to add firewall policies for a new data source integration.
On the **Data Sources** tab, click **Add Data Source** in the top-right corner.
A dialog appears showing all available data sources with icons. Use the search field to filter the list.
A descriptive label for the policy (e.g., "ADP OAuth", "Database Server", "Fabric").
Shows the current state of the policy:
* **Pending** — The policy has been saved but not yet deployed. It will become active after you click **Apply Changes** and the infrastructure transition completes.
* **Active** — The policy is deployed and enforced on your infrastructure.
Shows **application** (FQDN-based) or **network** (IP/CIDR-based).
The FQDN or IP address/CIDR range (e.g., `accounts.adp.com`, `1.2.3.4/32`).
A three-dot menu with **Edit** and **Delete** options.
## Adding a Data Source
Use this workflow to add firewall policies for a new data source integration.
On the **Data Sources** tab, click **Add Data Source** in the top-right corner.
A dialog appears showing all available data sources with icons. Use the search field to filter the list.
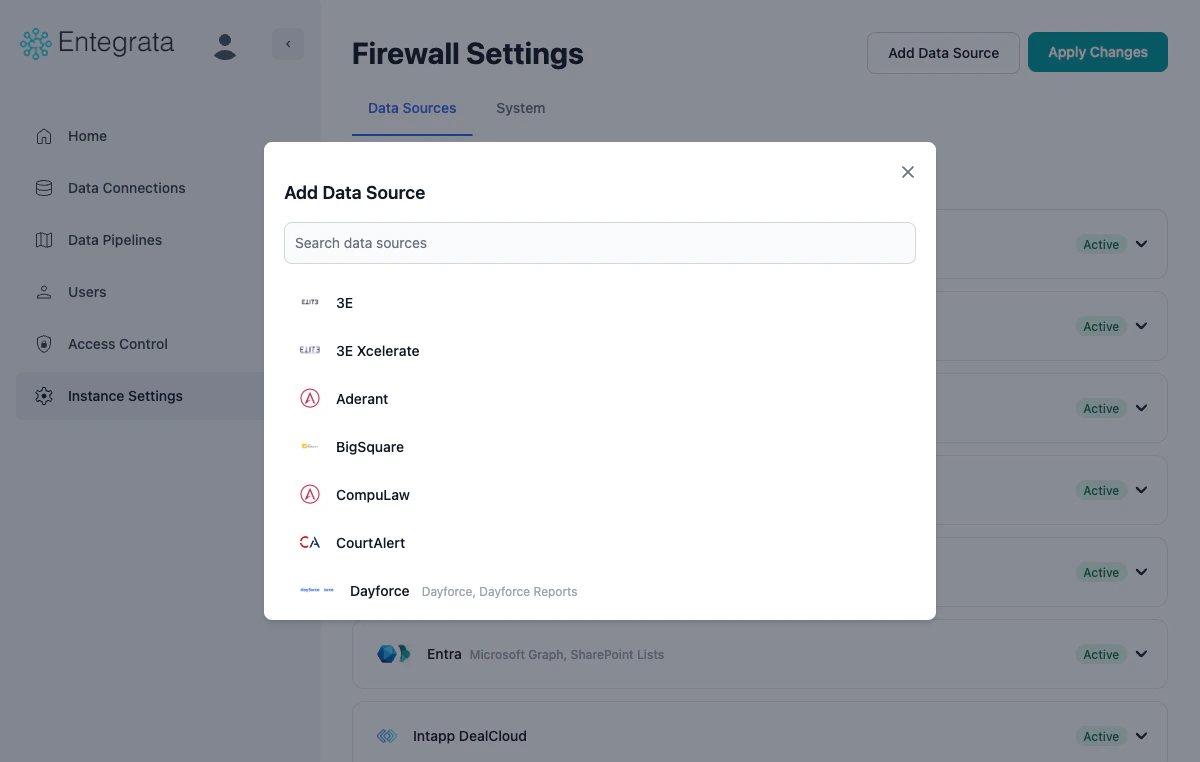 Click the data source you want to add (e.g., 3E, Aderant, Iridium).
The data source is added to your list in an **Inactive** state and automatically expanded, showing the message: *"This data source requires at least 1 policy to activate."*
Click **Add Policies** to open the guided policy configuration dialog. This dialog is tailored to the selected data source and shows:
**Required** — Policies that must be configured for the data source to function (e.g., a database server IP address).
**Suggested** — Optional policies that may be needed depending on your configuration (e.g., a DNS server).
For each policy:
1. Enter the IP address/CIDR range or domain in the text field
2. Click **Add** to save the policy
3. Click **Done** when finished
Click the data source you want to add (e.g., 3E, Aderant, Iridium).
The data source is added to your list in an **Inactive** state and automatically expanded, showing the message: *"This data source requires at least 1 policy to activate."*
Click **Add Policies** to open the guided policy configuration dialog. This dialog is tailored to the selected data source and shows:
**Required** — Policies that must be configured for the data source to function (e.g., a database server IP address).
**Suggested** — Optional policies that may be needed depending on your configuration (e.g., a DNS server).
For each policy:
1. Enter the IP address/CIDR range or domain in the text field
2. Click **Add** to save the policy
3. Click **Done** when finished
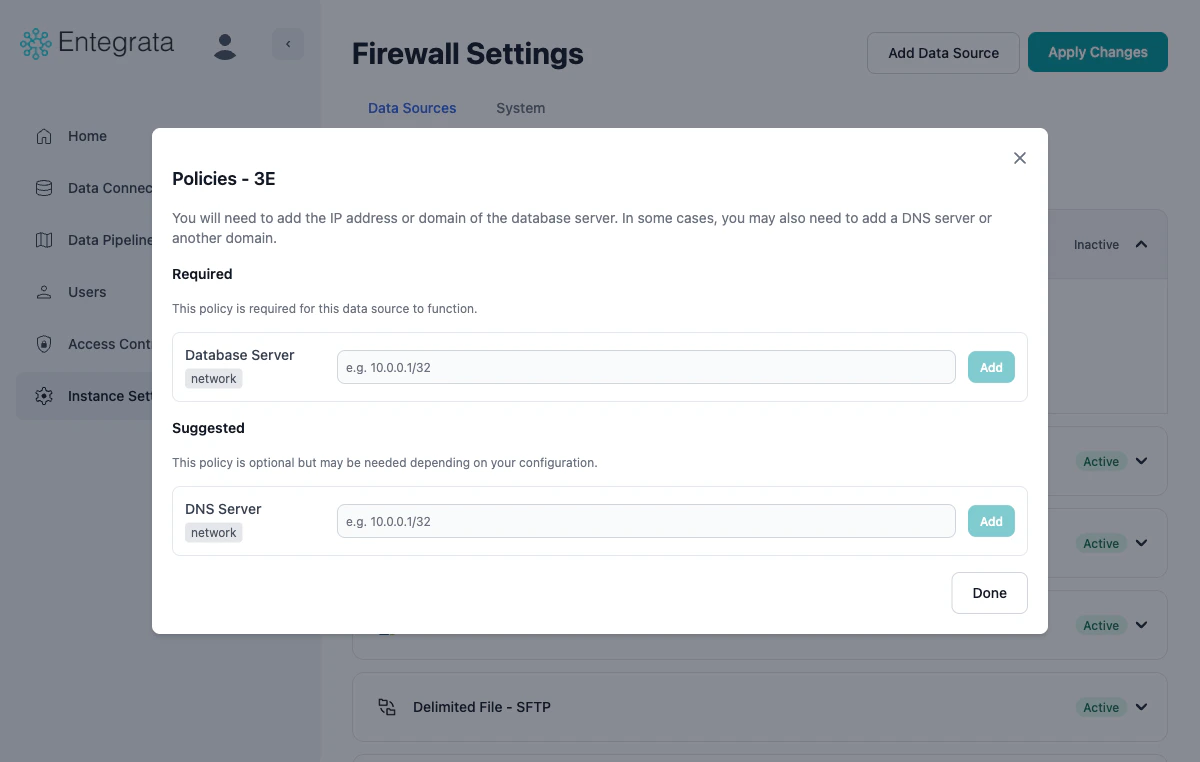 The policy type (network or application) is pre-selected based on what the data source requires. Placeholder text shows the expected format (e.g., `e.g. 10.0.0.1/32`).
Once policies are added, they appear with a **Pending** status. The data source is now listed but the policies are not yet enforced on your infrastructure.
The policy type (network or application) is pre-selected based on what the data source requires. Placeholder text shows the expected format (e.g., `e.g. 10.0.0.1/32`).
Once policies are added, they appear with a **Pending** status. The data source is now listed but the policies are not yet enforced on your infrastructure.
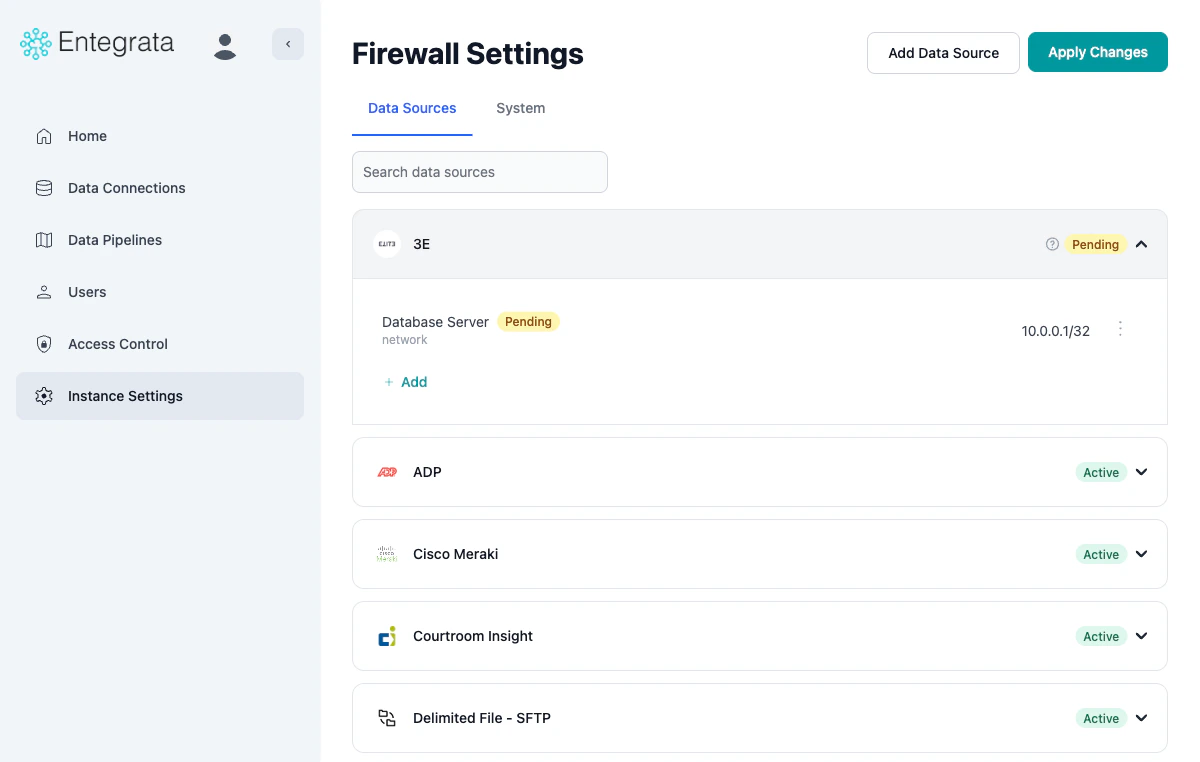 Click **Apply Changes** to deploy the new policies to your infrastructure. Once the infrastructure transition completes, the policy status changes from **Pending** to **Active** and the data source becomes fully operational.
Policies remain in **Pending** state until you click **Apply Changes** and the transition completes. They are not enforced on your infrastructure until they reach **Active** status.
### Removing a Data Source
If a newly added data source is not needed, click **Remove** in the expanded data source card to remove it before applying changes.
## Adding a System Policy
Use this workflow to add custom system-level firewall policies.
Click the **System** tab at the top of the firewall settings page.
Click **Apply Changes** to deploy the new policies to your infrastructure. Once the infrastructure transition completes, the policy status changes from **Pending** to **Active** and the data source becomes fully operational.
Policies remain in **Pending** state until you click **Apply Changes** and the transition completes. They are not enforced on your infrastructure until they reach **Active** status.
### Removing a Data Source
If a newly added data source is not needed, click **Remove** in the expanded data source card to remove it before applying changes.
## Adding a System Policy
Use this workflow to add custom system-level firewall policies.
Click the **System** tab at the top of the firewall settings page.
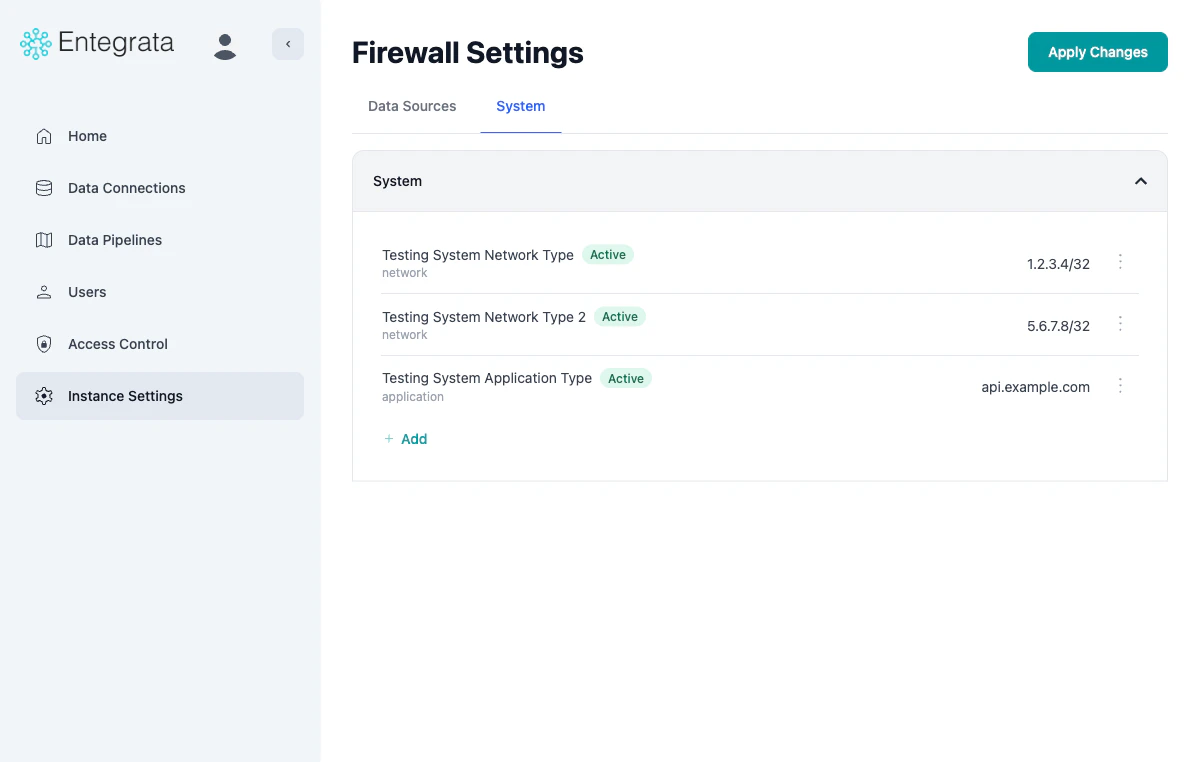 Click the **+ Add** button at the bottom of the System rules list.
Fill in the dialog fields:
* **Type**: Select **Network** (for IP/CIDR) or **Application** (for FQDN)
* **Name**: Enter a descriptive policy name
* **Value**: Enter the IP address/CIDR range or domain name
Click the **+ Add** button at the bottom of the System rules list.
Fill in the dialog fields:
* **Type**: Select **Network** (for IP/CIDR) or **Application** (for FQDN)
* **Name**: Enter a descriptive policy name
* **Value**: Enter the IP address/CIDR range or domain name
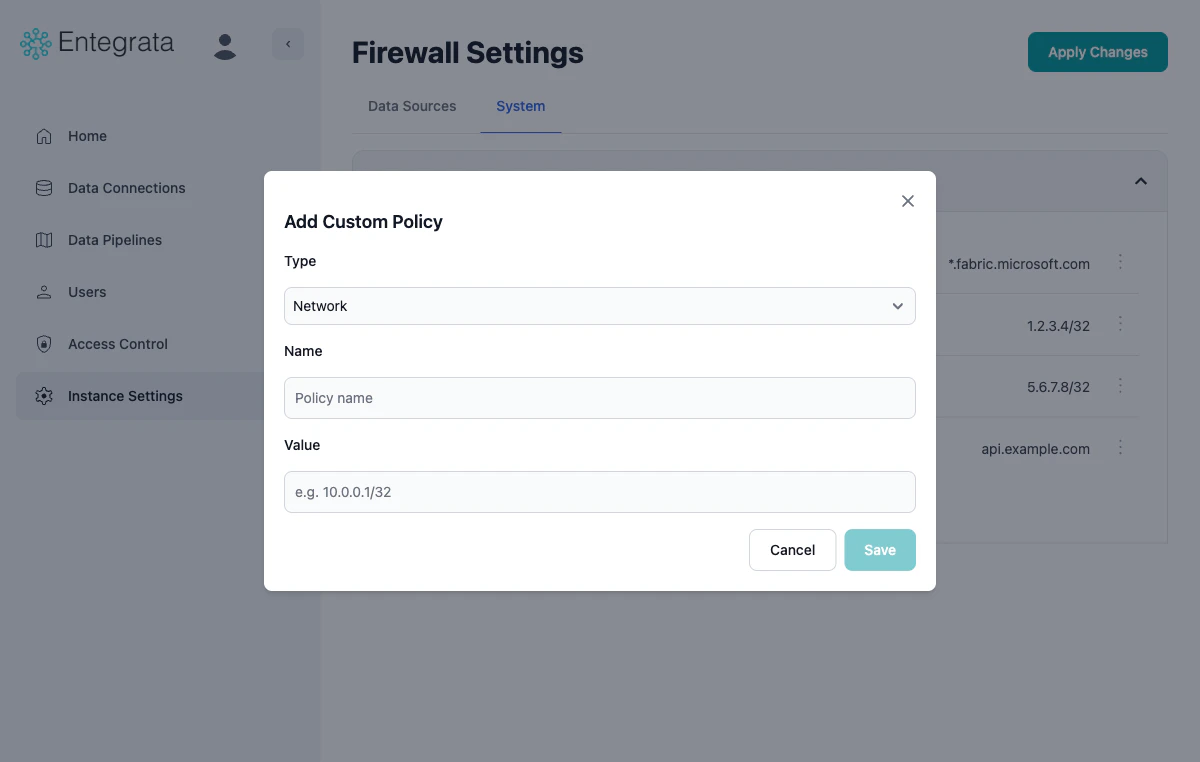 The placeholder text updates based on your type selection — `e.g. 10.0.0.1/32` for Network or a domain format for Application.
Click **Save** to add the policy. It appears in the System rules list immediately with a **Pending** status.
Click **Apply Changes** to deploy the policy to your infrastructure. Once the transition completes, the policy status changes from **Pending** to **Active**.
## Adding a Policy to an Existing Data Source
You can add additional policies to data sources that are already configured.
On the **Data Sources** tab, click the data source card to expand it and view its current policies.
Click the **+ Add** button at the bottom of the policy list within the expanded data source.
The Add Custom Policy dialog opens. Select the policy type, enter a name and value, then click **Save**. The new policy appears with a **Pending** status.
Click **Apply Changes** to deploy the updated configuration. The policy status changes to **Active** once the transition completes.
## Editing a Policy
Expand the relevant data source on the **Data Sources** tab, or navigate to the **System** tab.
Click the three-dot menu (⋮) on the right side of the policy row and select **Edit**.
The placeholder text updates based on your type selection — `e.g. 10.0.0.1/32` for Network or a domain format for Application.
Click **Save** to add the policy. It appears in the System rules list immediately with a **Pending** status.
Click **Apply Changes** to deploy the policy to your infrastructure. Once the transition completes, the policy status changes from **Pending** to **Active**.
## Adding a Policy to an Existing Data Source
You can add additional policies to data sources that are already configured.
On the **Data Sources** tab, click the data source card to expand it and view its current policies.
Click the **+ Add** button at the bottom of the policy list within the expanded data source.
The Add Custom Policy dialog opens. Select the policy type, enter a name and value, then click **Save**. The new policy appears with a **Pending** status.
Click **Apply Changes** to deploy the updated configuration. The policy status changes to **Active** once the transition completes.
## Editing a Policy
Expand the relevant data source on the **Data Sources** tab, or navigate to the **System** tab.
Click the three-dot menu (⋮) on the right side of the policy row and select **Edit**.
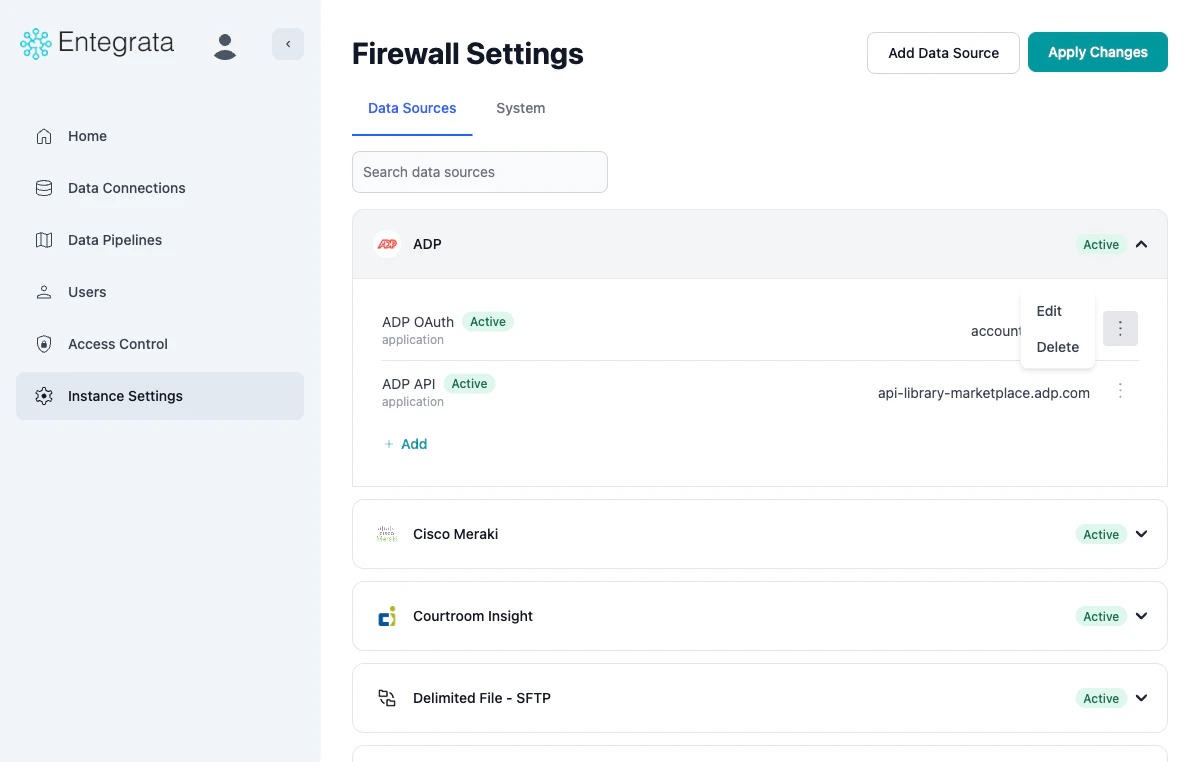 Modify the policy details as needed. The same validation rules apply as when creating a new policy.
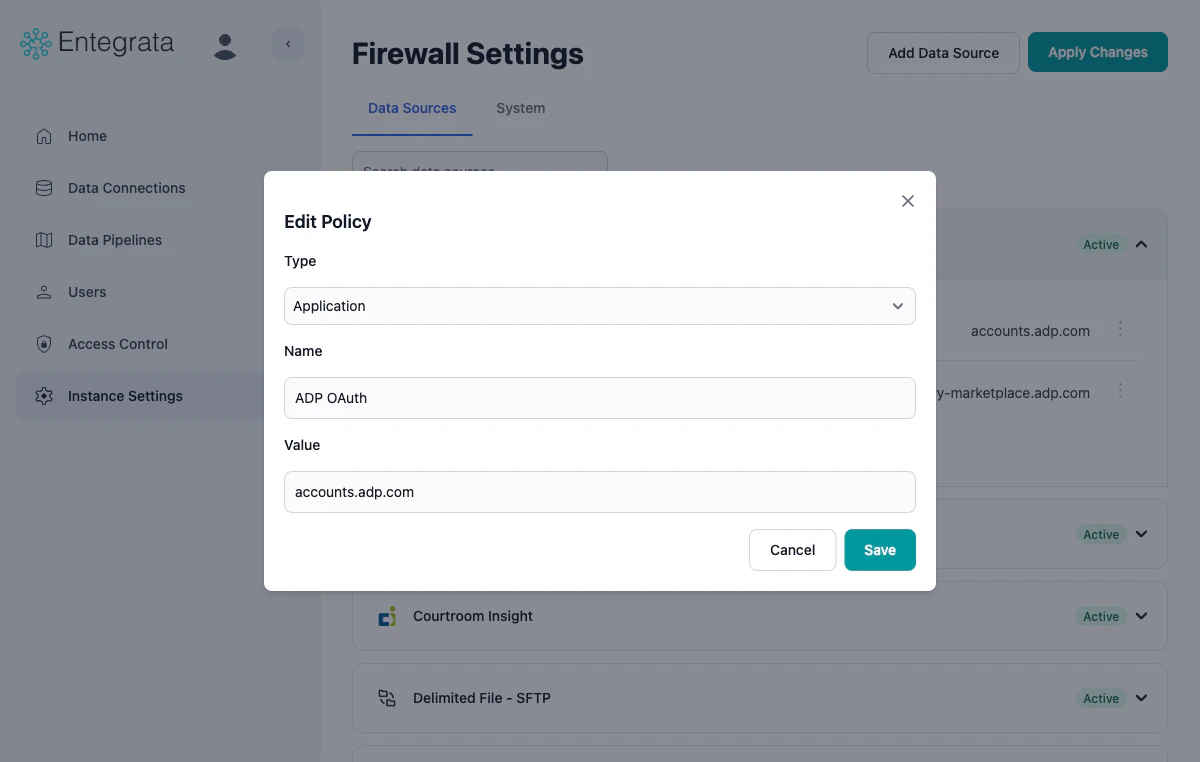 Click **Save**, then click **Apply Changes** to deploy the update to your infrastructure.
## Deleting a Policy
Before deleting a policy, ensure it is not required for active data collection or critical integrations. Removing a policy may cause collectors or integrations to fail.
Expand the relevant data source or navigate to the **System** tab.
Click the three-dot menu (⋮) on the policy row and select **Delete**.
Click **Apply Changes** to remove the policy from your infrastructure.
The deletion is saved to your configuration immediately but the policy remains active on your infrastructure until you apply changes.
## Applying Firewall Changes
### Understanding the Save-Then-Apply Workflow
Firewall management uses a **save-then-apply** workflow. When you add or edit a policy, it is saved with a **Pending** status. Pending policies are not enforced on your infrastructure until you click **Apply Changes** and the transition completes, at which point they become **Active**.
Add, edit, or delete policies as needed. You can batch multiple changes together.
Click the **Apply Changes** button to deploy all staged changes to Azure infrastructure.
The system triggers an infrastructure update:
* Status changes to **Transitioning**
* A loading screen displays progress
* The system polls for completion every 30 seconds
* Changes are deployed via Pulumi Infrastructure as Code
Once the transition completes:
* Instance status returns to **Idle**
* All **Pending** policies transition to **Active**
* New firewall policies are now enforced
* Your instance can access newly allowed destinations
* Removed destinations are now blocked
### Why Save-Then-Apply?
**Safety**: Review all changes before deploying to production
**Efficiency**: Batch multiple policy changes into a single infrastructure update
**Flexibility**: Experiment with policies without immediately affecting infrastructure
**Transparency**: Clear separation between configuration and deployment
### During Transition State
While your instance is in **Transitioning** state:
* Existing firewall policies remain active
* Data collection continues normally
* You cannot make additional firewall changes
* You cannot modify other instance settings
* You cannot apply new changes until transition completes
Firewall infrastructure transitions typically take 5-15 minutes depending on the complexity of changes being deployed.
## Validation Rules
**These will be accepted:**
* `api.salesforce.com`
* `*.azure.com`
* `app.subdomain.example.com`
* `service-123.cloud.provider.net`
* `my-api.example.co.uk`
**These will be rejected:**
* `*.com` (wildcard too broad)
* `example` (missing TLD)
* `http://api.example.com` (includes protocol)
* `api.example.com:443` (includes port)
* `api..example.com` (double dots)
**These will be accepted:**
* `192.168.1.100`
* `192.168.1.100/32`
* `10.0.0.0/24`
* `172.16.0.0/16`
* `203.0.113.0/28`
**These will be rejected:**
* `256.1.1.1` (octet > 255)
* `192.168.1.1/33` (CIDR > 32)
* `192.168.1` (incomplete IP)
* `2001:db8::1` (IPv6 not supported)
* `192.168.1.1-192.168.1.10` (range notation not supported)
## Troubleshooting
**Symptoms**: Collector reports connection failures despite policy being added
**Solutions**:
* Check if the policy status is still **Pending** — policies are not enforced until they reach **Active** status after applying changes
* Wait for any Transitioning state to complete
* Double-check the policy value matches the collector's actual endpoint
* Ensure the policy uses the correct type (application for domains, network for IPs)
* Check collector logs for the actual connection target
**Symptoms**: Data source remains Inactive even after adding policies
**Solutions**:
* Ensure at least one **Required** policy has been added
* Verify the policy value passed validation (no error messages in the form)
* Try removing and re-adding the data source
**Symptoms**: The data source you need is not listed
**Solutions**:
* Check the search field for typos
* The data source may already be added — check the Data Sources tab
* If the data source is not in the catalog, add rules manually via the **System** tab
**Symptoms**: Connection fails despite a wildcard rule that should match
**Solutions**:
* `*.example.com` matches `api.example.com` but NOT `api.sub.example.com`
* For nested subdomains, add multiple rules or use exact domains
* `*.example.com` does not match `example.com` itself — add both if needed
* Verify the policy has been applied (not just saved)
**Symptoms**: Apply Changes triggered but state doesn't return to Idle
**Solutions**:
* Wait at least 15-20 minutes for infrastructure updates
* Refresh the page to see current status
* Check Azure portal for alerts in your subscription
* If it persists beyond 30 minutes, contact Entegrata support
## Security Best Practices
**Principle of Least Privilege**
* Only allow access to services actively in use
* Use specific FQDNs over wildcards when possible
* Prefer /32 CIDR (single IP) over broad ranges
* Use the guided policy setup when adding data sources — it recommends only what's needed
**Regular Audits**
* Review firewall policies quarterly
* Remove data sources that are no longer in use
* Verify policies match active collectors and integrations
* Use the search feature to quickly audit specific data sources
**Change Management**
* Test policy changes in non-production environments first
* Batch related changes and apply them together
* Coordinate firewall changes with your security team
* Plan changes during maintenance windows
## Related Documentation
Configure S2S VPN or VNet Peering for network connectivity
Learn about instance administration concepts
Set up data collectors that use firewall rules
Get help with firewall configuration issues
Click **Save**, then click **Apply Changes** to deploy the update to your infrastructure.
## Deleting a Policy
Before deleting a policy, ensure it is not required for active data collection or critical integrations. Removing a policy may cause collectors or integrations to fail.
Expand the relevant data source or navigate to the **System** tab.
Click the three-dot menu (⋮) on the policy row and select **Delete**.
Click **Apply Changes** to remove the policy from your infrastructure.
The deletion is saved to your configuration immediately but the policy remains active on your infrastructure until you apply changes.
## Applying Firewall Changes
### Understanding the Save-Then-Apply Workflow
Firewall management uses a **save-then-apply** workflow. When you add or edit a policy, it is saved with a **Pending** status. Pending policies are not enforced on your infrastructure until you click **Apply Changes** and the transition completes, at which point they become **Active**.
Add, edit, or delete policies as needed. You can batch multiple changes together.
Click the **Apply Changes** button to deploy all staged changes to Azure infrastructure.
The system triggers an infrastructure update:
* Status changes to **Transitioning**
* A loading screen displays progress
* The system polls for completion every 30 seconds
* Changes are deployed via Pulumi Infrastructure as Code
Once the transition completes:
* Instance status returns to **Idle**
* All **Pending** policies transition to **Active**
* New firewall policies are now enforced
* Your instance can access newly allowed destinations
* Removed destinations are now blocked
### Why Save-Then-Apply?
**Safety**: Review all changes before deploying to production
**Efficiency**: Batch multiple policy changes into a single infrastructure update
**Flexibility**: Experiment with policies without immediately affecting infrastructure
**Transparency**: Clear separation between configuration and deployment
### During Transition State
While your instance is in **Transitioning** state:
* Existing firewall policies remain active
* Data collection continues normally
* You cannot make additional firewall changes
* You cannot modify other instance settings
* You cannot apply new changes until transition completes
Firewall infrastructure transitions typically take 5-15 minutes depending on the complexity of changes being deployed.
## Validation Rules
**These will be accepted:**
* `api.salesforce.com`
* `*.azure.com`
* `app.subdomain.example.com`
* `service-123.cloud.provider.net`
* `my-api.example.co.uk`
**These will be rejected:**
* `*.com` (wildcard too broad)
* `example` (missing TLD)
* `http://api.example.com` (includes protocol)
* `api.example.com:443` (includes port)
* `api..example.com` (double dots)
**These will be accepted:**
* `192.168.1.100`
* `192.168.1.100/32`
* `10.0.0.0/24`
* `172.16.0.0/16`
* `203.0.113.0/28`
**These will be rejected:**
* `256.1.1.1` (octet > 255)
* `192.168.1.1/33` (CIDR > 32)
* `192.168.1` (incomplete IP)
* `2001:db8::1` (IPv6 not supported)
* `192.168.1.1-192.168.1.10` (range notation not supported)
## Troubleshooting
**Symptoms**: Collector reports connection failures despite policy being added
**Solutions**:
* Check if the policy status is still **Pending** — policies are not enforced until they reach **Active** status after applying changes
* Wait for any Transitioning state to complete
* Double-check the policy value matches the collector's actual endpoint
* Ensure the policy uses the correct type (application for domains, network for IPs)
* Check collector logs for the actual connection target
**Symptoms**: Data source remains Inactive even after adding policies
**Solutions**:
* Ensure at least one **Required** policy has been added
* Verify the policy value passed validation (no error messages in the form)
* Try removing and re-adding the data source
**Symptoms**: The data source you need is not listed
**Solutions**:
* Check the search field for typos
* The data source may already be added — check the Data Sources tab
* If the data source is not in the catalog, add rules manually via the **System** tab
**Symptoms**: Connection fails despite a wildcard rule that should match
**Solutions**:
* `*.example.com` matches `api.example.com` but NOT `api.sub.example.com`
* For nested subdomains, add multiple rules or use exact domains
* `*.example.com` does not match `example.com` itself — add both if needed
* Verify the policy has been applied (not just saved)
**Symptoms**: Apply Changes triggered but state doesn't return to Idle
**Solutions**:
* Wait at least 15-20 minutes for infrastructure updates
* Refresh the page to see current status
* Check Azure portal for alerts in your subscription
* If it persists beyond 30 minutes, contact Entegrata support
## Security Best Practices
**Principle of Least Privilege**
* Only allow access to services actively in use
* Use specific FQDNs over wildcards when possible
* Prefer /32 CIDR (single IP) over broad ranges
* Use the guided policy setup when adding data sources — it recommends only what's needed
**Regular Audits**
* Review firewall policies quarterly
* Remove data sources that are no longer in use
* Verify policies match active collectors and integrations
* Use the search feature to quickly audit specific data sources
**Change Management**
* Test policy changes in non-production environments first
* Batch related changes and apply them together
* Coordinate firewall changes with your security team
* Plan changes during maintenance windows
## Related Documentation
Configure S2S VPN or VNet Peering for network connectivity
Learn about instance administration concepts
Set up data collectors that use firewall rules
Get help with firewall configuration issues