> ## Documentation Index
> Fetch the complete documentation index at: https://support.entegrata.com/llms.txt
> Use this file to discover all available pages before exploring further.
# User Management
> Learn how to view, add, edit, deactivate, and delete users in your Entegrata instance.
## Creating Users
Administrators can add new users from the **Users** section of the Admin Portal.
### **Step 1: Open the Create User Dialog**
1. Navigate to **Administration** → **Users**
2. Click the **New User** button in the top-right corner
 ### **Step 2: Enter User Information**
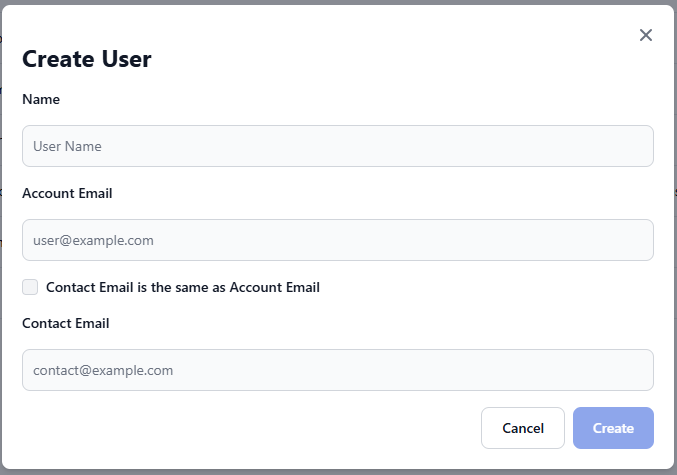 ### Required Fields
Enter the user's full name as it should appear in the system.
The primary email address for user authentication.
#### Optional Fields
An alternative email for non-authentication communications.
**Options:**
* Leave blank to use the account email for all communications
* Check "Use same as account email" to automatically copy the account email
* Enter a different email for separate communication preferences
**Behavior**
* Users are created with an **Active** status by default.
* There is **no invitation workflow** — notify new users manually after creation.
* The **Account Email** must be unique and cannot be changed after activation.
* If **Contact Email** is left blank, it defaults to the account email.
**Limitations**
* No bulk import or role assignment during creation
* No password setup (handled via SSO or first-login reset)
* No custom templates or attributes
**Common Errors**
* Duplicate or invalid email address
* Missing required fields
***
## Viewing and Searching Users
The **Users** list displays all active users in your instance. Inactive and deleted users are hidden by default.
### Status Indicators
User status is displayed with color-coded badges for quick identification:
### Required Fields
Enter the user's full name as it should appear in the system.
The primary email address for user authentication.
#### Optional Fields
An alternative email for non-authentication communications.
**Options:**
* Leave blank to use the account email for all communications
* Check "Use same as account email" to automatically copy the account email
* Enter a different email for separate communication preferences
**Behavior**
* Users are created with an **Active** status by default.
* There is **no invitation workflow** — notify new users manually after creation.
* The **Account Email** must be unique and cannot be changed after activation.
* If **Contact Email** is left blank, it defaults to the account email.
**Limitations**
* No bulk import or role assignment during creation
* No password setup (handled via SSO or first-login reset)
* No custom templates or attributes
**Common Errors**
* Duplicate or invalid email address
* Missing required fields
***
## Viewing and Searching Users
The **Users** list displays all active users in your instance. Inactive and deleted users are hidden by default.
### Status Indicators
User status is displayed with color-coded badges for quick identification:
🟢 **Active** - User can access the system
🟡 **Pending** - User invited but not activated
⚫ **Inactive** - Account temporarily disabled
🔴 **Deleted** - User has been removed
Currently, the interface displays only active users. Deleted and inactive users are filtered from the view.
### Search
Use the search bar to find users by \*\*name \*\*or **email**. Results update in real time.
Filtering by user status and bulk operations are not yet supported.
### Individual Actions
Click a user row to open the edit view, or use the ⋮ actions menu for quick operations such as *Edit* or *Delete (soft delete)*.
***
## Editing Users
Administrators can update user information directly from the list.
All edits are logged automatically in the audit trail `updatedAt`, `updatedBy`).
## Accessing the Edit User Feature
There are two ways to edit a user:
### **Method 1: Click on User Row**
Click anywhere on a user's row in the user list table to open the edit modal.
 ### Method 2: Actions Menu
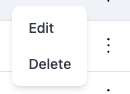
1. Click the actions menu (⋮) in the user's row
2. Select **Edit** from the dropdown
### Method 2: Actions Menu
1. Click the actions menu (⋮) in the user's row
2. Select **Edit** from the dropdown
 **Editable Fields**
* **Name** — updates display name throughout the system
* **Account Email** — must remain unique; affects login credentials
* **Contact Email** — optional; defaults to account email
**Non-Editable Fields**
User ID, Firm ID, Instance ID, Status, and Azure Entra ID.
**Behavior**
Edits take effect immediately uopn Save and are recorded in the audit trail.
The system does **not** automatically notify users — admins should communicate any critical changes manually.
**Limitations**
* Roles and permissions are not editable here
* Status changes managed separately
* No bulk edit or version history
***
## Deactivating and Deleting Users
Deleting users in Entegrata uses a **soft-delete** approach, which marks users as deleted while preserving their data for audit and historical purposes. This ensures data integrity and allows for potential recovery if needed.
Soft-deleted users cannot log in or access the system, but their historical data and audit trails remain intact.
### Step 1: Access Delete Option
Click the actions menu (⋮) in the user's row and select **Delete**.
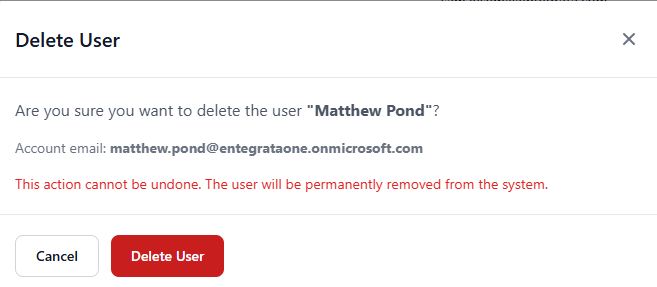
### Step 2: Confirm Deletion
A confirmation dialog will appear to prevent accidental deletions.
**Editable Fields**
* **Name** — updates display name throughout the system
* **Account Email** — must remain unique; affects login credentials
* **Contact Email** — optional; defaults to account email
**Non-Editable Fields**
User ID, Firm ID, Instance ID, Status, and Azure Entra ID.
**Behavior**
Edits take effect immediately uopn Save and are recorded in the audit trail.
The system does **not** automatically notify users — admins should communicate any critical changes manually.
**Limitations**
* Roles and permissions are not editable here
* Status changes managed separately
* No bulk edit or version history
***
## Deactivating and Deleting Users
Deleting users in Entegrata uses a **soft-delete** approach, which marks users as deleted while preserving their data for audit and historical purposes. This ensures data integrity and allows for potential recovery if needed.
Soft-deleted users cannot log in or access the system, but their historical data and audit trails remain intact.
### Step 1: Access Delete Option
Click the actions menu (⋮) in the user's row and select **Delete**.
### Step 2: Confirm Deletion
A confirmation dialog will appear to prevent accidental deletions.
 **Behavior**
* Status changes to **Deleted**, ending all sessions and invalidating tokens
* Audit logs and historical data remain intact
* Deletions are recorded with who performed the action and when
**Recovery**
Soft-deleted users cannot be restored through the UI.
Contact Entegrata Support if recovery is required.
**Best Practices**
* Confirm deletion is appropriate and reassign any owned resources
* Notify relevant team members and document the reason
**Retention**
Data for deleted users remains under your firm’s retention policy until manually purged.
## Related Documentation
Understanding user management basics in the platform
Common issues and solutions for user management
**Behavior**
* Status changes to **Deleted**, ending all sessions and invalidating tokens
* Audit logs and historical data remain intact
* Deletions are recorded with who performed the action and when
**Recovery**
Soft-deleted users cannot be restored through the UI.
Contact Entegrata Support if recovery is required.
**Best Practices**
* Confirm deletion is appropriate and reassign any owned resources
* Notify relevant team members and document the reason
**Retention**
Data for deleted users remains under your firm’s retention policy until manually purged.
## Related Documentation
Understanding user management basics in the platform
Common issues and solutions for user management