> ## Documentation Index
> Fetch the complete documentation index at: https://support.entegrata.com/llms.txt
> Use this file to discover all available pages before exploring further.
# Enable Resources
> Turn on data collection for specific resources
## Overview
Enabling resources activates data collection for specific tables, views, or endpoints. Only enabled resources collect data according to their configured schedules.
New resources discovered automatically default to **Inactive** status. You must explicitly enable them to begin collection.
## How Resource Enabling Works
When you enable a resource:
1. The resource toggle turns ON (green)
2. Changes are staged (not yet saved)
3. Click **Save** to apply and begin collection
4. The resource starts collecting according to its schedule
## Enabling Single Resources
Find the resource in the Resources table
Click the toggle switch in the first column
The toggle turns green (ON)
Click the **Save** button in the floating save bar
Changes are not applied until you click Save. You can toggle multiple resources before saving.
The resource is now active and will collect on its next scheduled time
## Enabling Multiple Resources
You can enable several resources at once before saving:
Click the toggle for each resource you want to enable
The floating save bar shows how many resources have pending changes
Check the save bar to confirm the count
Click **Save** to activate all toggled resources at once
Batch enabling is efficient when setting up a new connection - enable all needed resources, then save once.
## Bulk Import Resources
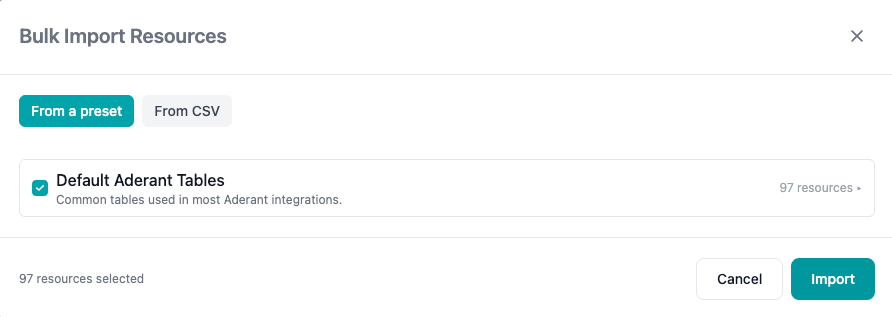
When a connection has many resources, toggling each one is slow. **Bulk Import Resources** enables many resources at once — either from a curated **preset** or from a **CSV file** you upload.
To open it, go to the **Resources** page and select **Bulk Import Resources** from the actions menu (next to **Refresh Source Schema**).
 Bulk import enables resources that have already been discovered on the connection. If a resource you expect isn't listed, run **Refresh Source Schema** first, then import.
Presets are curated bundles of the resources most integrations need, offered for supported data sources (for example, 3E, Aderant, and Iridium).
If presets exist for the connection's data source, the **From a preset** tab is selected by default.
Choose one or more presets. Every resource in a selected preset is checked by default.
Expand a preset to see its resources and uncheck any you don't want to enable.
Click **Import**. The selected resources are enabled immediately.
If a data source has no presets defined, only the CSV option is shown.
Upload a CSV that lists the resources to enable — useful when you have a known set of tables to turn on.
Select the **From CSV** tab (it's the only option when no presets are available).
Click **Download CSV template** to get a correctly formatted starter file.
Add a header column named `tables` (the headers `table` and `table_names` also work, in any case), with one resource name per row:
```csv template.csv theme={null}
tables
Matter
Client
Timecard
```
Select your file. The dialog lists the resources it found, each checked by default. Uncheck any you don't want.
Click **Import** to enable the selected resources.
If the file can't be read, or has no `tables` / `table` / `table_names` column, an error message explains what to fix. Resource names that don't match a discovered resource are skipped — the rest are still enabled.
Unlike single and multiple toggles, bulk import applies as soon as you click **Import** — there's no separate **Save** step. Imported resources begin collecting on their next scheduled time (or trigger a manual collection to test).
## Disabling Resources
The same process works in reverse to disable collection:
Click the blue toggle to turn it gray (OFF)
Click **Save** in the floating bar
The resource stops collecting data
* Scheduled jobs are canceled
* Existing data in lakehouse is preserved
Disabling a resource stops all future collections. Historical data remains but no new data is collected.
## Canceling Changes
To discard toggled changes before saving:
Click **Cancel** in the floating save bar
All toggles return to their saved state
## Access Control Requirements
Some resources cannot be enabled without access control configuration:
**Indicators**:
* Lock icon next to resource name
* Toggle is disabled (grayed out)
* Tooltip explains access control requirement
**Resolution**:
1. Configure access control for the resource
2. See [Access Control](/data/access_control/overview) documentation
3. Return to enable the resource once access control is set
Access control ensures only authorized users can query this resource's data in your lakehouse.
## Connection-Level Impact
Remember that connection status affects all resources:
| Connection Status | Resource Toggle ON | Will Resource Collect? |
| ----------------- | ------------------ | ------------------------ |
| Active | Yes | ✅ Yes |
| Active | No | ❌ No |
| Inactive | Yes | ❌ No - Connection paused |
| Inactive | No | ❌ No |
Even if a resource is enabled, it won't collect if the connection is set to Inactive.
## First Collection After Enabling
When you first enable a resource:
Collection starts at the next scheduled interval
* Connection schedule (if resource uses default)
* Resource schedule (if custom override configured)
Don't want to wait? Trigger a manual collection:
* Click on the resource name
* Click **Start a Collection**
* See [Triggering Collection](/data/collector/resources/triggering-collection)
Watch the first collection to verify:
* Authentication works
* Data is accessible
* No configuration errors
After enabling critical resources, trigger a manual collection to verify they work immediately rather than waiting for the schedule.
## Common Workflows
### Initial Setup: Enable Core Tables
After creating a connection:
Browse the discovered resources list
Determine which tables/endpoints contain needed data
Toggle ON the essential resources first (customers, products, transactions)
Save changes and trigger manual collection to test
After core resources work, enable supplementary data
Setting up a large connection? Use [Bulk Import Resources](#bulk-import-resources) to enable a preset or a CSV list of tables in one step instead of toggling each resource.
### Temporary Pause: Disable During Maintenance
To temporarily stop collection:
Toggle OFF resources undergoing maintenance
Apply the changes
Complete source system work
Toggle back ON and save
For connection-wide pauses, set the connection to Inactive instead of disabling individual resources.
## Best Practices
Enable a few critical resources first, verify they work, then expand
Enable and test in a development connection before production
Keep notes on why certain resources are enabled or disabled
Regularly review enabled resources to ensure they're still needed
## Troubleshooting
### Toggle Won't Turn On
**Symptoms**: Click toggle but it doesn't change
**Possible causes**:
* Access control required
* Network issue
* Browser cache problem
**Resolution**:
1. Check for lock icon (access control required)
2. Refresh the page and try again
3. Check browser console for errors
### Changes Not Saving
**Symptoms**: Click Save but resources don't activate
**Possible causes**:
* Network interruption
* Server error
* Validation failure
**Resolution**:
1. Check for error messages
2. Refresh page and check resource status
3. Try enabling fewer resources at once
4. Contact support if issue persists
### Resource Enabled But Not Collecting
**Symptoms**: Resource is active but no jobs appear
**Possible causes**:
* Connection is inactive
* Schedule hasn't triggered yet
**Resolution**:
1. Verify connection status is Active
2. Check schedule timing
3. Trigger manual collection to test
4. See [Troubleshooting](/data/collector/resources/troubleshooting)
## Next Steps
Configure schedules and load types for enabled resources
Manually start collection for testing
Track collection execution and performance
Resolve resource collection issues
Bulk import enables resources that have already been discovered on the connection. If a resource you expect isn't listed, run **Refresh Source Schema** first, then import.
Presets are curated bundles of the resources most integrations need, offered for supported data sources (for example, 3E, Aderant, and Iridium).
If presets exist for the connection's data source, the **From a preset** tab is selected by default.
Choose one or more presets. Every resource in a selected preset is checked by default.
Expand a preset to see its resources and uncheck any you don't want to enable.
Click **Import**. The selected resources are enabled immediately.
If a data source has no presets defined, only the CSV option is shown.
Upload a CSV that lists the resources to enable — useful when you have a known set of tables to turn on.
Select the **From CSV** tab (it's the only option when no presets are available).
Click **Download CSV template** to get a correctly formatted starter file.
Add a header column named `tables` (the headers `table` and `table_names` also work, in any case), with one resource name per row:
```csv template.csv theme={null}
tables
Matter
Client
Timecard
```
Select your file. The dialog lists the resources it found, each checked by default. Uncheck any you don't want.
Click **Import** to enable the selected resources.
If the file can't be read, or has no `tables` / `table` / `table_names` column, an error message explains what to fix. Resource names that don't match a discovered resource are skipped — the rest are still enabled.
Unlike single and multiple toggles, bulk import applies as soon as you click **Import** — there's no separate **Save** step. Imported resources begin collecting on their next scheduled time (or trigger a manual collection to test).
## Disabling Resources
The same process works in reverse to disable collection:
Click the blue toggle to turn it gray (OFF)
Click **Save** in the floating bar
The resource stops collecting data
* Scheduled jobs are canceled
* Existing data in lakehouse is preserved
Disabling a resource stops all future collections. Historical data remains but no new data is collected.
## Canceling Changes
To discard toggled changes before saving:
Click **Cancel** in the floating save bar
All toggles return to their saved state
## Access Control Requirements
Some resources cannot be enabled without access control configuration:
**Indicators**:
* Lock icon next to resource name
* Toggle is disabled (grayed out)
* Tooltip explains access control requirement
**Resolution**:
1. Configure access control for the resource
2. See [Access Control](/data/access_control/overview) documentation
3. Return to enable the resource once access control is set
Access control ensures only authorized users can query this resource's data in your lakehouse.
## Connection-Level Impact
Remember that connection status affects all resources:
| Connection Status | Resource Toggle ON | Will Resource Collect? |
| ----------------- | ------------------ | ------------------------ |
| Active | Yes | ✅ Yes |
| Active | No | ❌ No |
| Inactive | Yes | ❌ No - Connection paused |
| Inactive | No | ❌ No |
Even if a resource is enabled, it won't collect if the connection is set to Inactive.
## First Collection After Enabling
When you first enable a resource:
Collection starts at the next scheduled interval
* Connection schedule (if resource uses default)
* Resource schedule (if custom override configured)
Don't want to wait? Trigger a manual collection:
* Click on the resource name
* Click **Start a Collection**
* See [Triggering Collection](/data/collector/resources/triggering-collection)
Watch the first collection to verify:
* Authentication works
* Data is accessible
* No configuration errors
After enabling critical resources, trigger a manual collection to verify they work immediately rather than waiting for the schedule.
## Common Workflows
### Initial Setup: Enable Core Tables
After creating a connection:
Browse the discovered resources list
Determine which tables/endpoints contain needed data
Toggle ON the essential resources first (customers, products, transactions)
Save changes and trigger manual collection to test
After core resources work, enable supplementary data
Setting up a large connection? Use [Bulk Import Resources](#bulk-import-resources) to enable a preset or a CSV list of tables in one step instead of toggling each resource.
### Temporary Pause: Disable During Maintenance
To temporarily stop collection:
Toggle OFF resources undergoing maintenance
Apply the changes
Complete source system work
Toggle back ON and save
For connection-wide pauses, set the connection to Inactive instead of disabling individual resources.
## Best Practices
Enable a few critical resources first, verify they work, then expand
Enable and test in a development connection before production
Keep notes on why certain resources are enabled or disabled
Regularly review enabled resources to ensure they're still needed
## Troubleshooting
### Toggle Won't Turn On
**Symptoms**: Click toggle but it doesn't change
**Possible causes**:
* Access control required
* Network issue
* Browser cache problem
**Resolution**:
1. Check for lock icon (access control required)
2. Refresh the page and try again
3. Check browser console for errors
### Changes Not Saving
**Symptoms**: Click Save but resources don't activate
**Possible causes**:
* Network interruption
* Server error
* Validation failure
**Resolution**:
1. Check for error messages
2. Refresh page and check resource status
3. Try enabling fewer resources at once
4. Contact support if issue persists
### Resource Enabled But Not Collecting
**Symptoms**: Resource is active but no jobs appear
**Possible causes**:
* Connection is inactive
* Schedule hasn't triggered yet
**Resolution**:
1. Verify connection status is Active
2. Check schedule timing
3. Trigger manual collection to test
4. See [Troubleshooting](/data/collector/resources/troubleshooting)
## Next Steps
Configure schedules and load types for enabled resources
Manually start collection for testing
Track collection execution and performance
Resolve resource collection issues