> ## Documentation Index
> Fetch the complete documentation index at: https://support.entegrata.com/llms.txt
> Use this file to discover all available pages before exploring further.
# Creating Pipelines
> Step-by-step guide to creating new data pipelines in Entegrata
## Overview
Creating a new pipeline is the first step in setting up your data integration workflow. This guide walks you through the process of creating a pipeline, from initial setup to configuring trigger settings.
## Prerequisites
Before creating a pipeline, ensure you have:
* Access to the Entegrata Admin Portal
* Appropriate permissions to create pipelines
* Understanding of what data you want to process
* Knowledge of your source data systems (configured in Collector)
## Creating a Pipeline
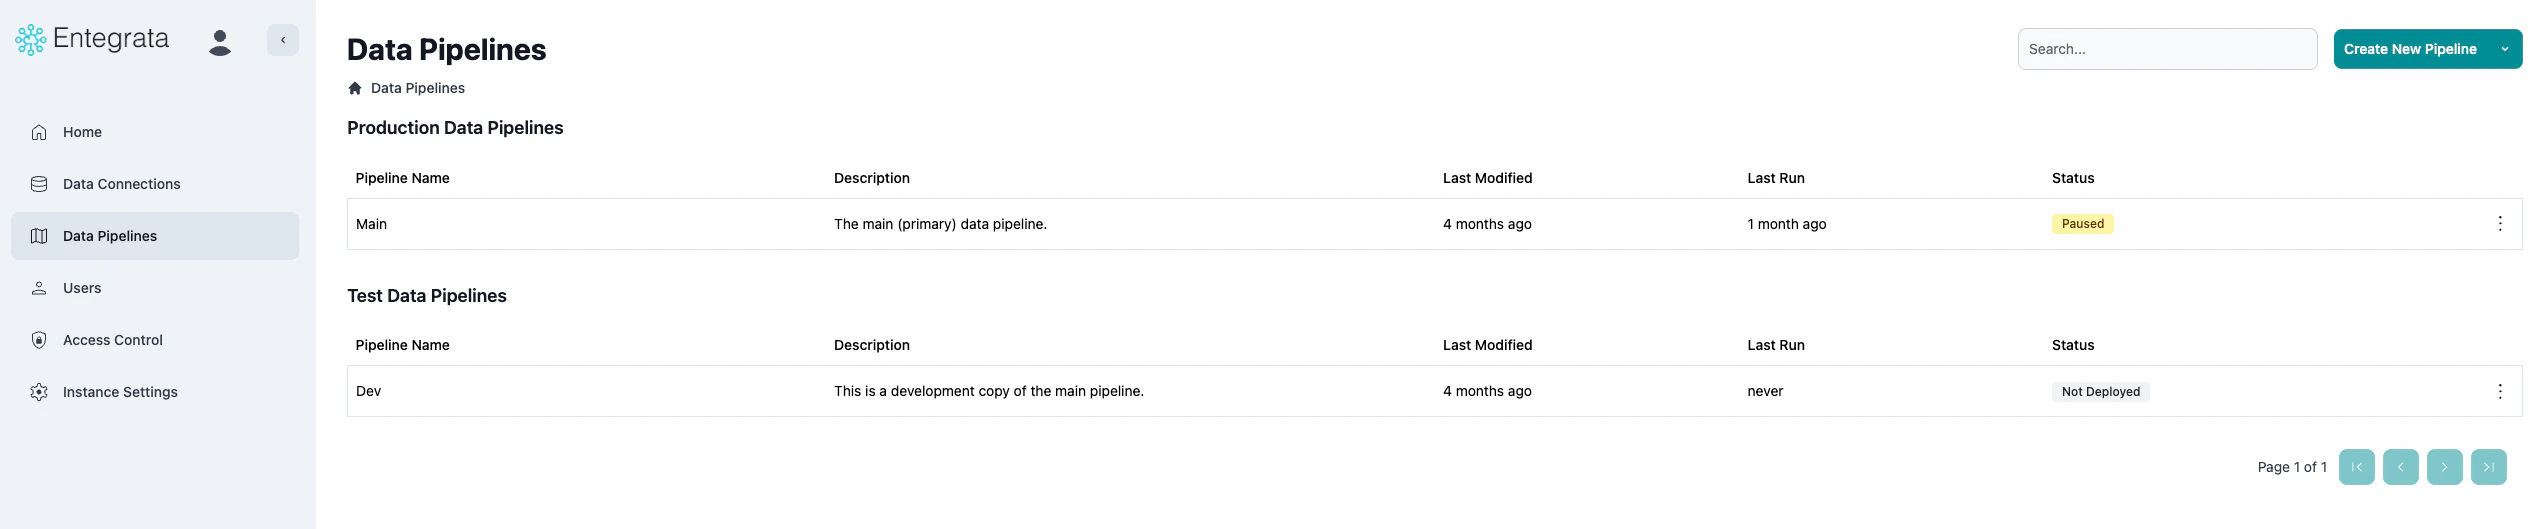
Log in to the [Entegrata Admin Portal](https://admin.entegrata.com) and click the **Pipelines** tab in the main navigation.
In the pipeline list view, click the **Create New Pipeline** button in the top-right corner of the page.
 In the Create New Pipeline dialog, provide the following information:
### Pipeline Name (Required)
Enter a descriptive name that clearly identifies the pipeline's purpose.
**Examples:**
* "Client Data Processing Pipeline"
* "Daily ETL Pipeline"
* "Historical Account Migration"
* "Real-time Transaction Sync"
Choose business-friendly names that non-technical users can understand. The name will appear in reports, logs, and monitoring dashboards.
### Pipeline Key (Auto-generated)
The pipeline key is automatically generated from the name by converting it to lowercase and replacing spaces with underscores.
**Example:** "Client Data Processing Pipeline" becomes `client_data_processing_pipeline`
You can customize the key if needed, but it must be unique within your instance and contain only lowercase letters, numbers, and underscores.
In the Create New Pipeline dialog, provide the following information:
### Pipeline Name (Required)
Enter a descriptive name that clearly identifies the pipeline's purpose.
**Examples:**
* "Client Data Processing Pipeline"
* "Daily ETL Pipeline"
* "Historical Account Migration"
* "Real-time Transaction Sync"
Choose business-friendly names that non-technical users can understand. The name will appear in reports, logs, and monitoring dashboards.
### Pipeline Key (Auto-generated)
The pipeline key is automatically generated from the name by converting it to lowercase and replacing spaces with underscores.
**Example:** "Client Data Processing Pipeline" becomes `client_data_processing_pipeline`
You can customize the key if needed, but it must be unique within your instance and contain only lowercase letters, numbers, and underscores.
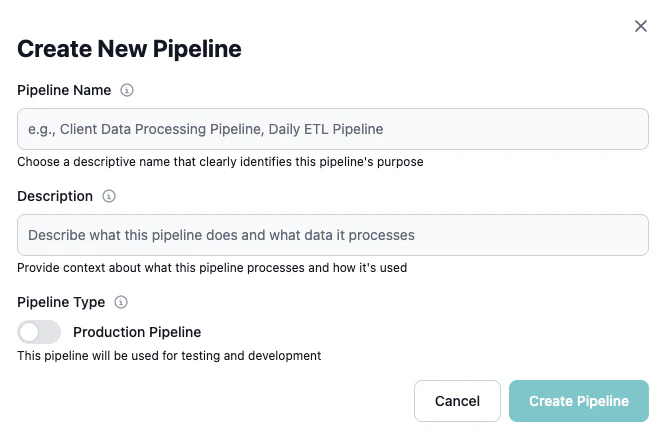 Provide a detailed description of what the pipeline does, what data it processes, and how it fits into your workflows.
**Example:**
"Processes client demographic and contact information from Salesforce CRM. Runs nightly to update Client and Contact data types with changes from the previous 24 hours. Includes validation rules for email addresses and phone numbers."
Good descriptions help team members understand the pipeline's purpose and troubleshoot issues. Include:
* Data sources involved
* Data types processed
* Business context
* Any special considerations
Choose how the pipeline should be executed:
### No Trigger (Default)
Pipeline must be run manually by a user. Best for:
* Development and testing
* One-time data migrations
* Ad-hoc processing needs
### Manual
Explicitly configured for manual execution only. Same as "No Trigger" but more explicit.
### Event Driven
Pipeline runs automatically when specific events occur. Best for:
* Real-time or near-real-time processing
* Event-based workflows
* Triggered by external systems
Review all the information you've entered:
* Pipeline name is descriptive and unique
* Description provides sufficient context
* Trigger type matches your use case
Click **Create Pipeline** to save the new pipeline.
After successful creation, you'll see a success message and the pipeline will appear in the pipeline list.
The pipeline is created in **Draft** status, meaning it's not yet deployed to production. You can now:
* Add data type mappings
* Configure data sources
* Test the pipeline in dry-run mode
## After Creating a Pipeline
Once your pipeline is created, follow these next steps:
### 1. Add Data Type Mappings
Click on the pipeline name to open the mapping editor and start adding data types to process.
Learn how to add and configure data types in your pipeline
### 2. Configure Data Sources
For each data type, you'll need to connect to your Collector data sources and select which tables or resources to use.
Learn how to add and configure data sources for your mappings
### 3. Map Fields
Use the visual mapping editor to map source fields to data type fields, applying transformations as needed.
Learn how to map fields between sources and data types
### 4. Test the Pipeline
Before deploying to production, run the pipeline in dry-run mode to validate your mappings.
Learn how to test and execute pipelines
## Pipeline Creation Tips
**Start Simple, Then Expand**
Begin with a single data type and validate it works before adding more. This makes troubleshooting easier and builds confidence in your configuration.
**Use Consistent Naming Conventions**
Establish a naming pattern for your pipelines that includes:
* Data domain (e.g., "Client", "Portfolio", "Transaction")
* Frequency (e.g., "Daily", "Weekly", "Historical")
* Purpose (e.g., "Refresh", "Migration", "Sync")
Example: "Client Daily Refresh Pipeline"
**Document Thoroughly**
Use the description field to document:
* What data this pipeline processes
* Why certain design decisions were made
* Any dependencies or prerequisites
* Who to contact for questions
**Consider Data Volumes**
When scheduling pipelines:
* Estimate processing time based on data volume
* Avoid scheduling during peak business hours
* Allow buffer time between pipeline runs
* Monitor execution times and adjust schedules as needed
## Troubleshooting
### Can't Create Pipeline
**Problem:** The "Create New Pipeline" button is disabled or not visible.
**Solution:**
* Verify you have pipeline creation permissions
* Check that you're logged in with the correct account
* Contact your administrator if permissions are needed
### Pipeline Name Already Exists
**Problem:** Error message indicating the pipeline name is already in use.
**Solution:**
* Choose a different, unique name for your pipeline
* Check if a similar pipeline already exists that you could reuse or duplicate
* Add qualifiers to make the name unique (e.g., "V2", "Test", or a date)
### Pipeline Created But Not Visible
**Problem:** Pipeline was created successfully but doesn't appear in the list.
**Solution:**
* Refresh the page to reload the pipeline list
* Check if pagination is hiding your pipeline (it may be on another page)
* Use the search bar to find the pipeline by name
* Clear your browser cache if the issue persists
## Related Topics
Learn about pipeline lifecycle and management
How to modify existing pipeline settings
Create copies of existing pipelines
Next steps: Configure your data mappings
Provide a detailed description of what the pipeline does, what data it processes, and how it fits into your workflows.
**Example:**
"Processes client demographic and contact information from Salesforce CRM. Runs nightly to update Client and Contact data types with changes from the previous 24 hours. Includes validation rules for email addresses and phone numbers."
Good descriptions help team members understand the pipeline's purpose and troubleshoot issues. Include:
* Data sources involved
* Data types processed
* Business context
* Any special considerations
Choose how the pipeline should be executed:
### No Trigger (Default)
Pipeline must be run manually by a user. Best for:
* Development and testing
* One-time data migrations
* Ad-hoc processing needs
### Manual
Explicitly configured for manual execution only. Same as "No Trigger" but more explicit.
### Event Driven
Pipeline runs automatically when specific events occur. Best for:
* Real-time or near-real-time processing
* Event-based workflows
* Triggered by external systems
Review all the information you've entered:
* Pipeline name is descriptive and unique
* Description provides sufficient context
* Trigger type matches your use case
Click **Create Pipeline** to save the new pipeline.
After successful creation, you'll see a success message and the pipeline will appear in the pipeline list.
The pipeline is created in **Draft** status, meaning it's not yet deployed to production. You can now:
* Add data type mappings
* Configure data sources
* Test the pipeline in dry-run mode
## After Creating a Pipeline
Once your pipeline is created, follow these next steps:
### 1. Add Data Type Mappings
Click on the pipeline name to open the mapping editor and start adding data types to process.
Learn how to add and configure data types in your pipeline
### 2. Configure Data Sources
For each data type, you'll need to connect to your Collector data sources and select which tables or resources to use.
Learn how to add and configure data sources for your mappings
### 3. Map Fields
Use the visual mapping editor to map source fields to data type fields, applying transformations as needed.
Learn how to map fields between sources and data types
### 4. Test the Pipeline
Before deploying to production, run the pipeline in dry-run mode to validate your mappings.
Learn how to test and execute pipelines
## Pipeline Creation Tips
**Start Simple, Then Expand**
Begin with a single data type and validate it works before adding more. This makes troubleshooting easier and builds confidence in your configuration.
**Use Consistent Naming Conventions**
Establish a naming pattern for your pipelines that includes:
* Data domain (e.g., "Client", "Portfolio", "Transaction")
* Frequency (e.g., "Daily", "Weekly", "Historical")
* Purpose (e.g., "Refresh", "Migration", "Sync")
Example: "Client Daily Refresh Pipeline"
**Document Thoroughly**
Use the description field to document:
* What data this pipeline processes
* Why certain design decisions were made
* Any dependencies or prerequisites
* Who to contact for questions
**Consider Data Volumes**
When scheduling pipelines:
* Estimate processing time based on data volume
* Avoid scheduling during peak business hours
* Allow buffer time between pipeline runs
* Monitor execution times and adjust schedules as needed
## Troubleshooting
### Can't Create Pipeline
**Problem:** The "Create New Pipeline" button is disabled or not visible.
**Solution:**
* Verify you have pipeline creation permissions
* Check that you're logged in with the correct account
* Contact your administrator if permissions are needed
### Pipeline Name Already Exists
**Problem:** Error message indicating the pipeline name is already in use.
**Solution:**
* Choose a different, unique name for your pipeline
* Check if a similar pipeline already exists that you could reuse or duplicate
* Add qualifiers to make the name unique (e.g., "V2", "Test", or a date)
### Pipeline Created But Not Visible
**Problem:** Pipeline was created successfully but doesn't appear in the list.
**Solution:**
* Refresh the page to reload the pipeline list
* Check if pagination is hiding your pipeline (it may be on another page)
* Use the search bar to find the pipeline by name
* Clear your browser cache if the issue persists
## Related Topics
Learn about pipeline lifecycle and management
How to modify existing pipeline settings
Create copies of existing pipelines
Next steps: Configure your data mappings