Documentation Index
Fetch the complete documentation index at: https://support.entegrata.com/llms.txt
Use this file to discover all available pages before exploring further.
Overview
Access control groups allow you to organize users and apply permissions efficiently at scale. Instead of creating individual rules for each user, you can group users together and manage their permissions collectively. Groups support both static membership (manually selected users) and dynamic membership (automatically determined by filters), providing flexibility for various organizational structures.Understanding Groups
Group Types in Entegrata
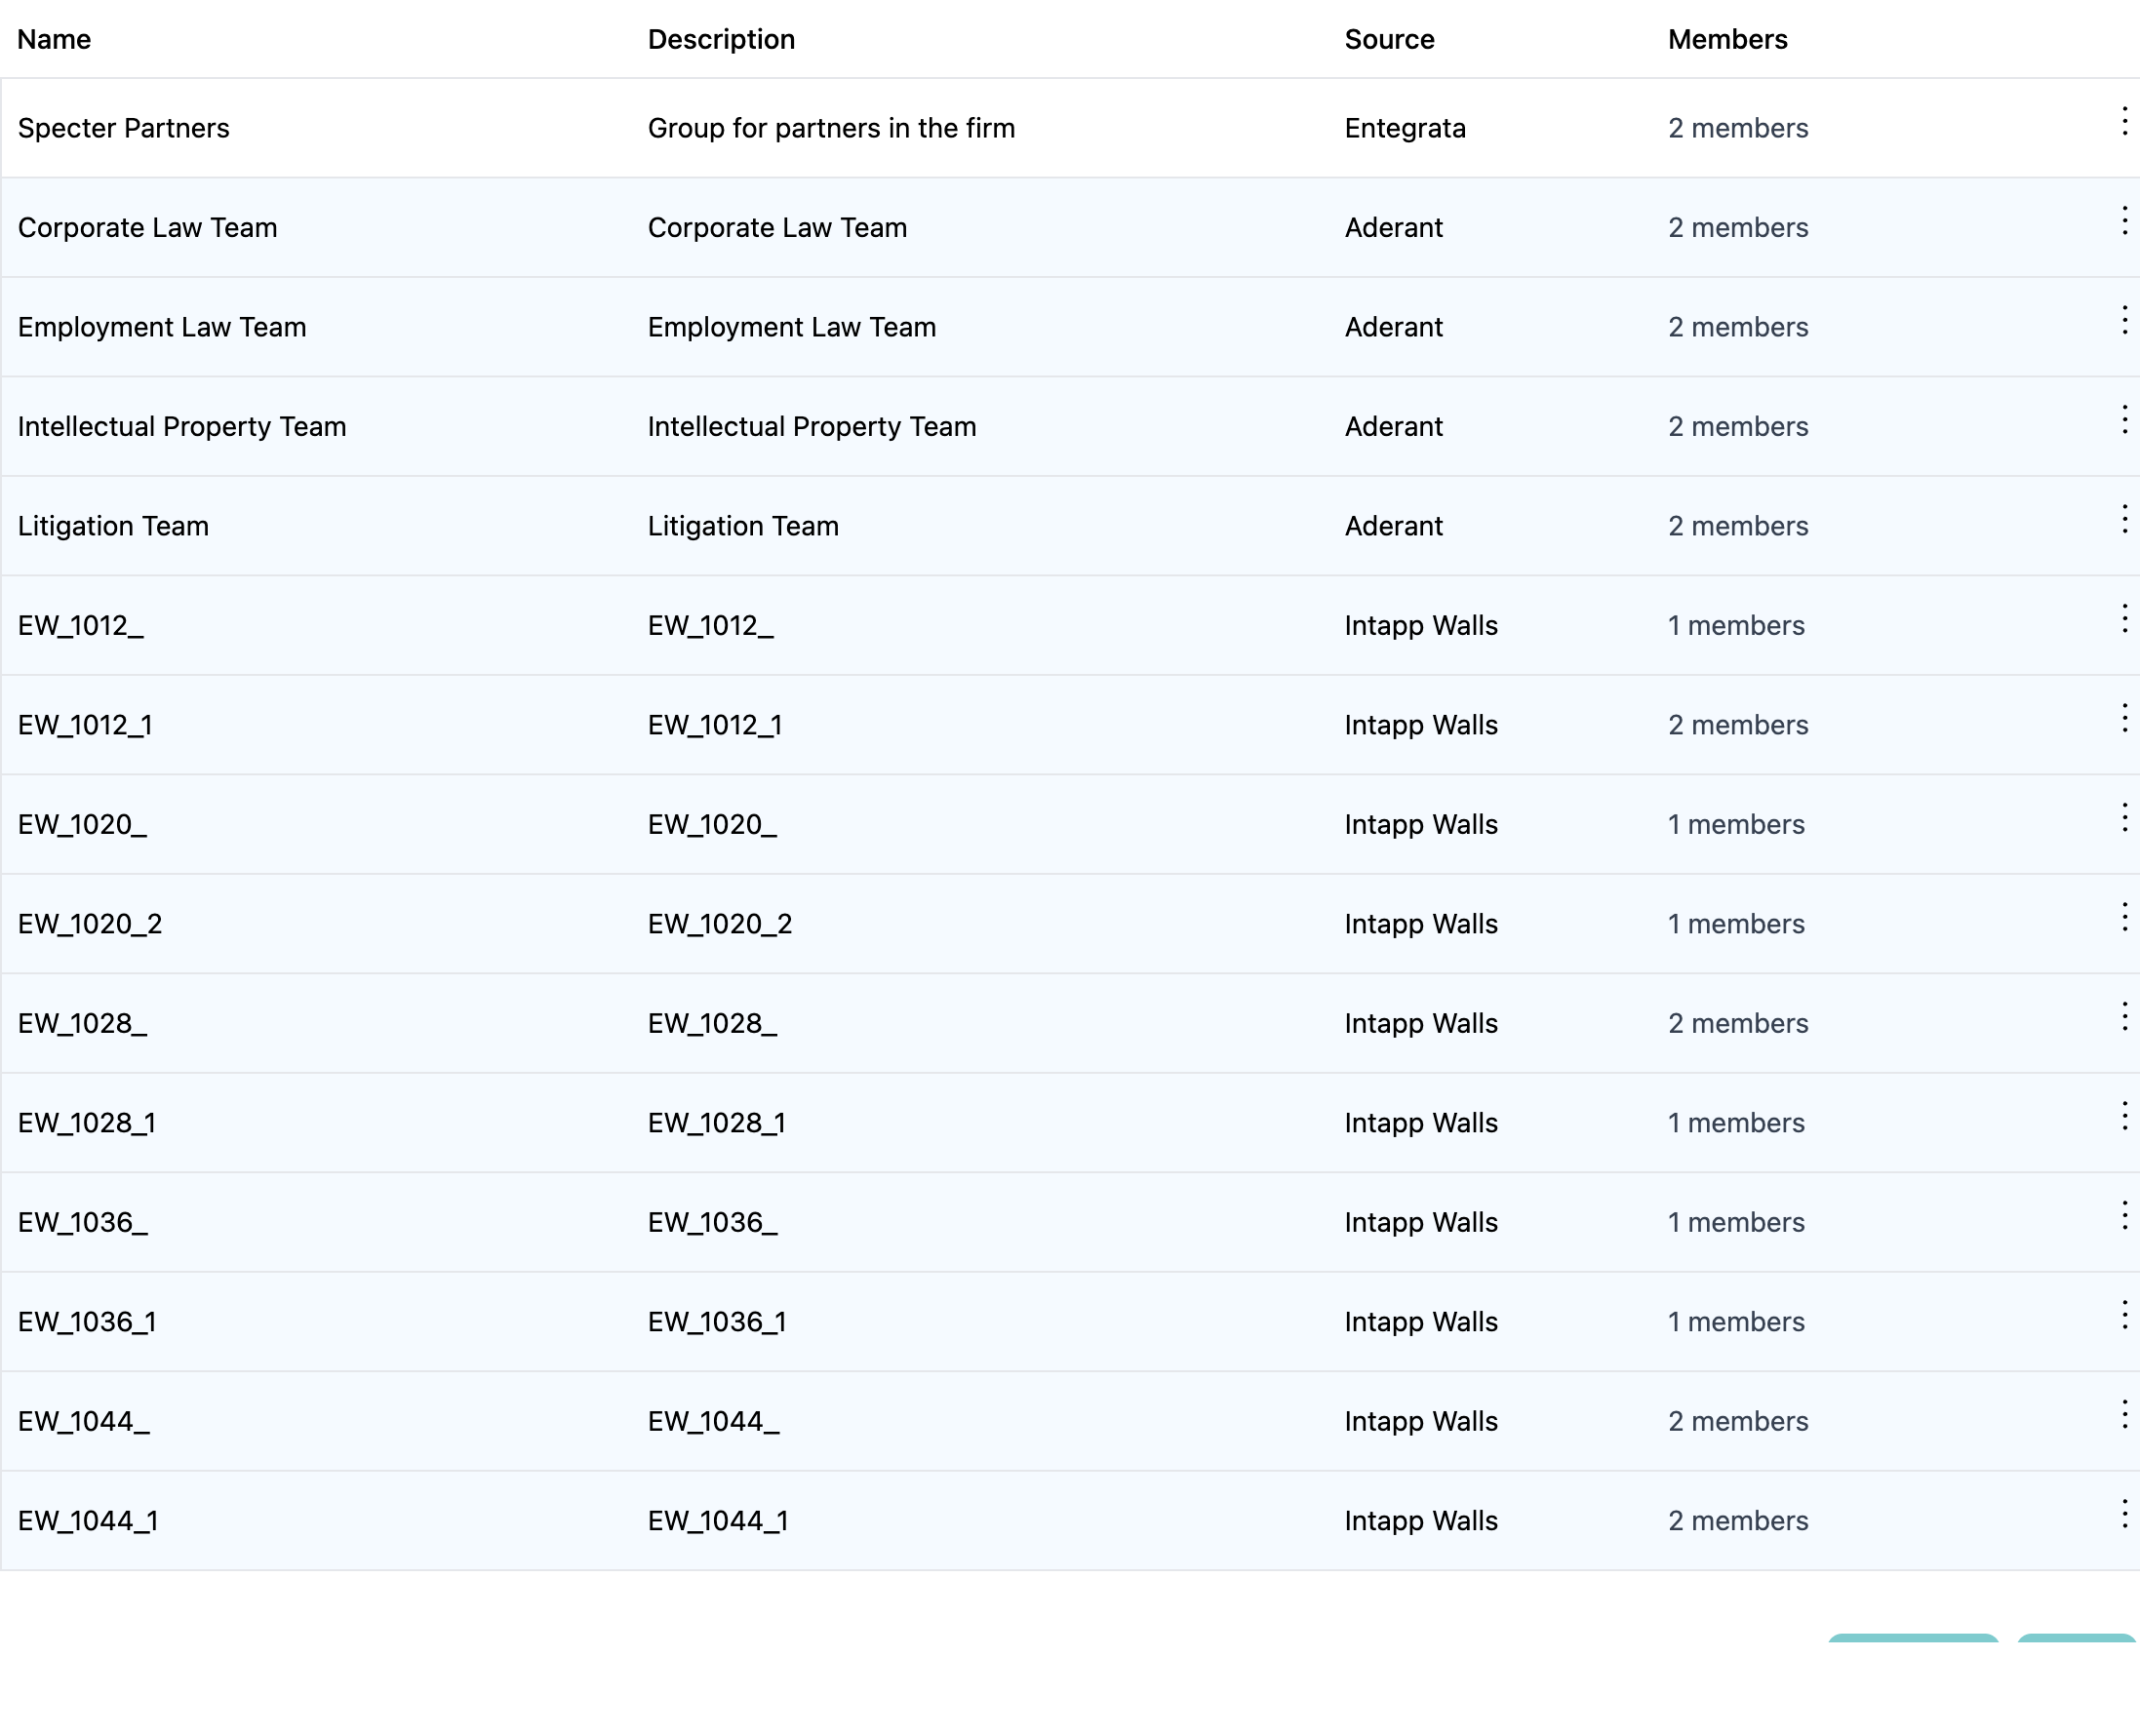
Entegrata provides centralized visibility into two types of access control groups:What are System Groups?
Groups created directly by administrators within Entegrata for custom access control management.Characteristics:
- Created and managed entirely within Entegrata
- Fully editable and deletable
- Display with standard formatting (white background)
- Show “System” in the Source column
- Support static membership (manually selected users)
- Support dynamic membership (filter-based automatic inclusion)
- Can include both users and other groups
What are Ingested Groups?
Groups imported from connected data sources (Aderant, Intapp Walls) during access control synchronization.Characteristics:
- Imported from external data sources
- Read-only (cannot be modified in Entegrata)
- Display with blue background tint for easy identification
- Show source system name (e.g., “Aderant”, “Intapp”) in Source column
- Membership is managed in the source system
- Automatically updated during synchronization
- Changes must be made in the originating system
The combination of system and ingested groups provides complete visibility into your access control configuration. You can create custom groups in Entegrata while maintaining synchronization with groups defined in your source systems.
Membership Models
- Static Membership
- Dynamic Membership
- Hybrid Membership
Characteristics:
- Members manually selected
- Explicit user and group lists
- Membership changes require manual updates
- Best for stable, well-defined teams
- Project teams
- Committees
- Temporary access groups
Creating a Group
Step 1: Navigate to Groups
- Go to Access Control → Groups in the main navigation
- The groups list displays all existing groups
Step 2: Initiate Group Creation
Click the New Group button in the toolbar: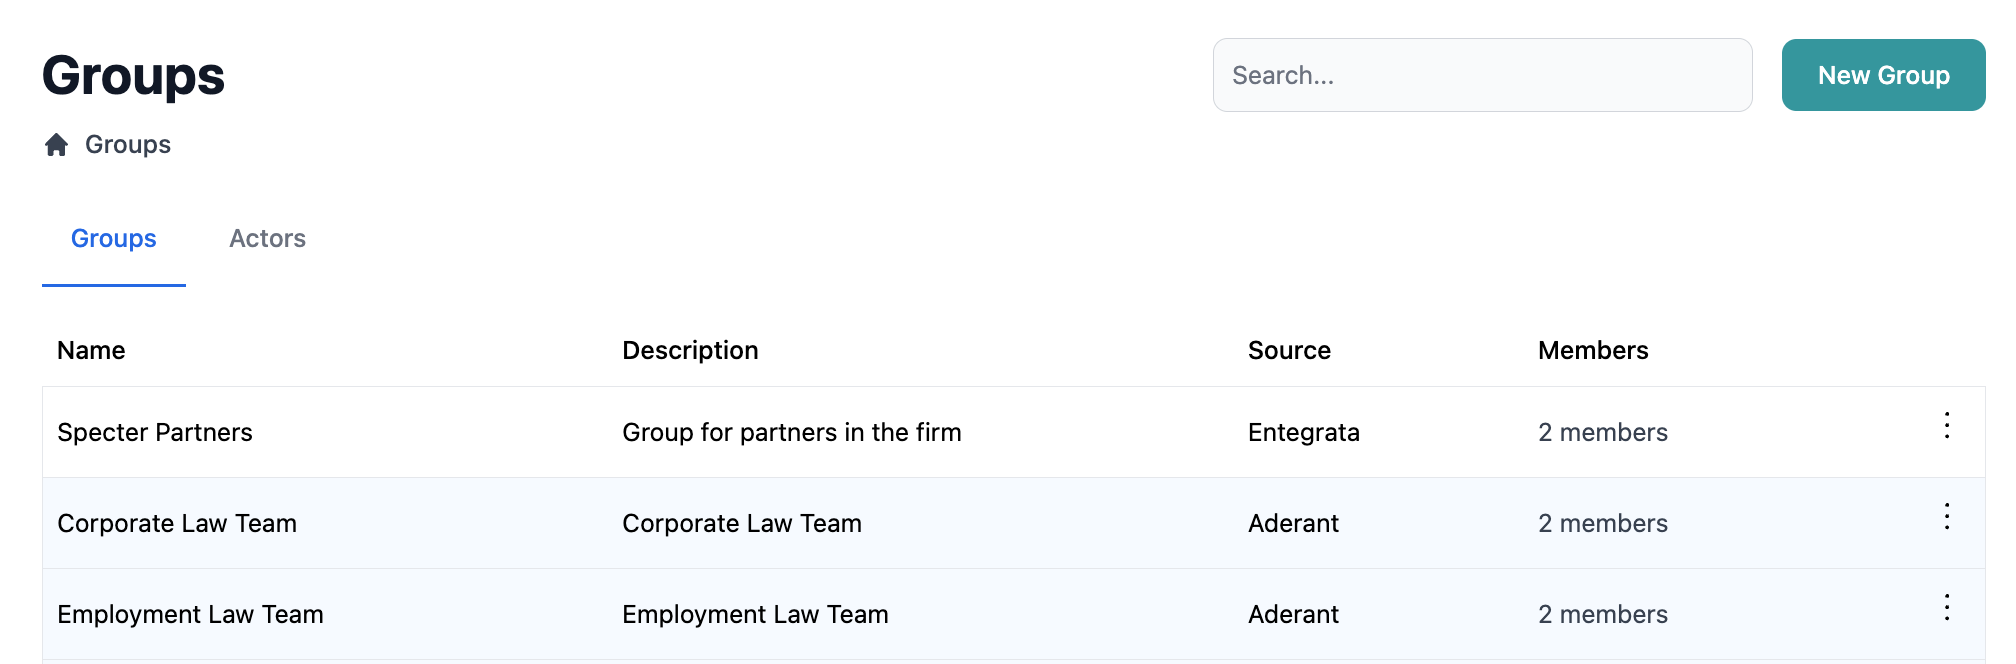
Step 3: Configure Group Settings
The Create Group modal opens with multiple tabs: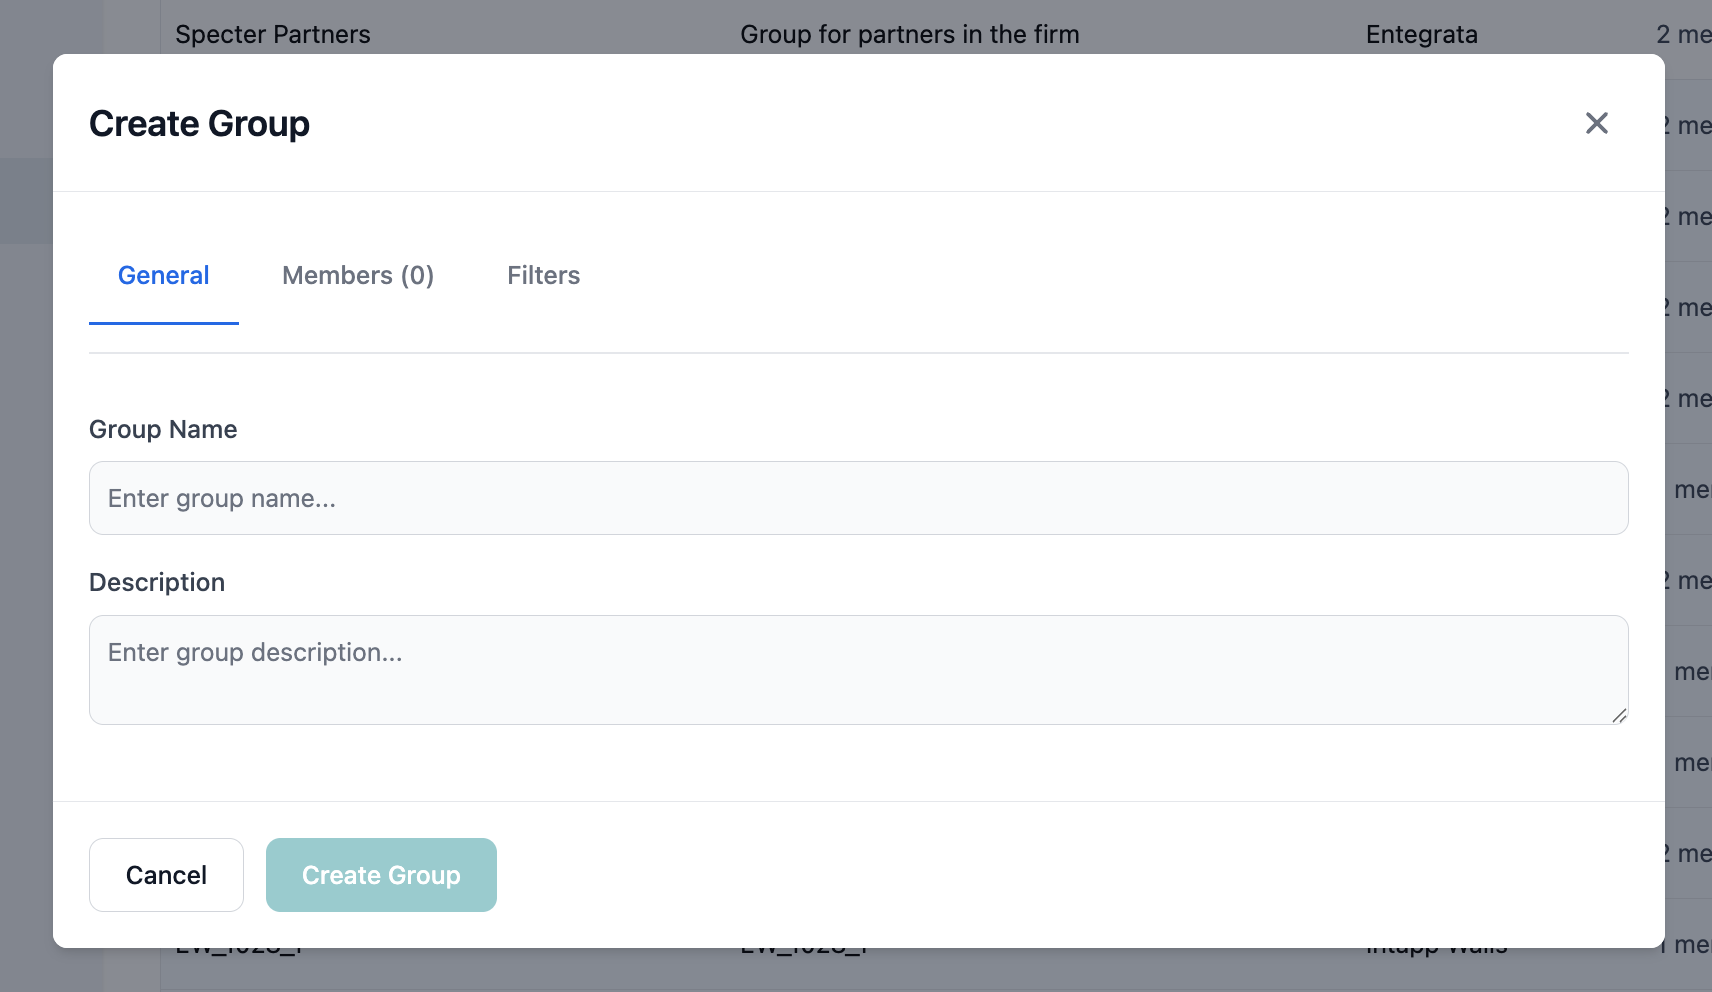
General Information
Enter Group Name
Provide a clear, descriptive name:
- Good: “Legal Department”, “Project Alpha Team”
- Avoid: “Group1”, “Test”, “Temp”
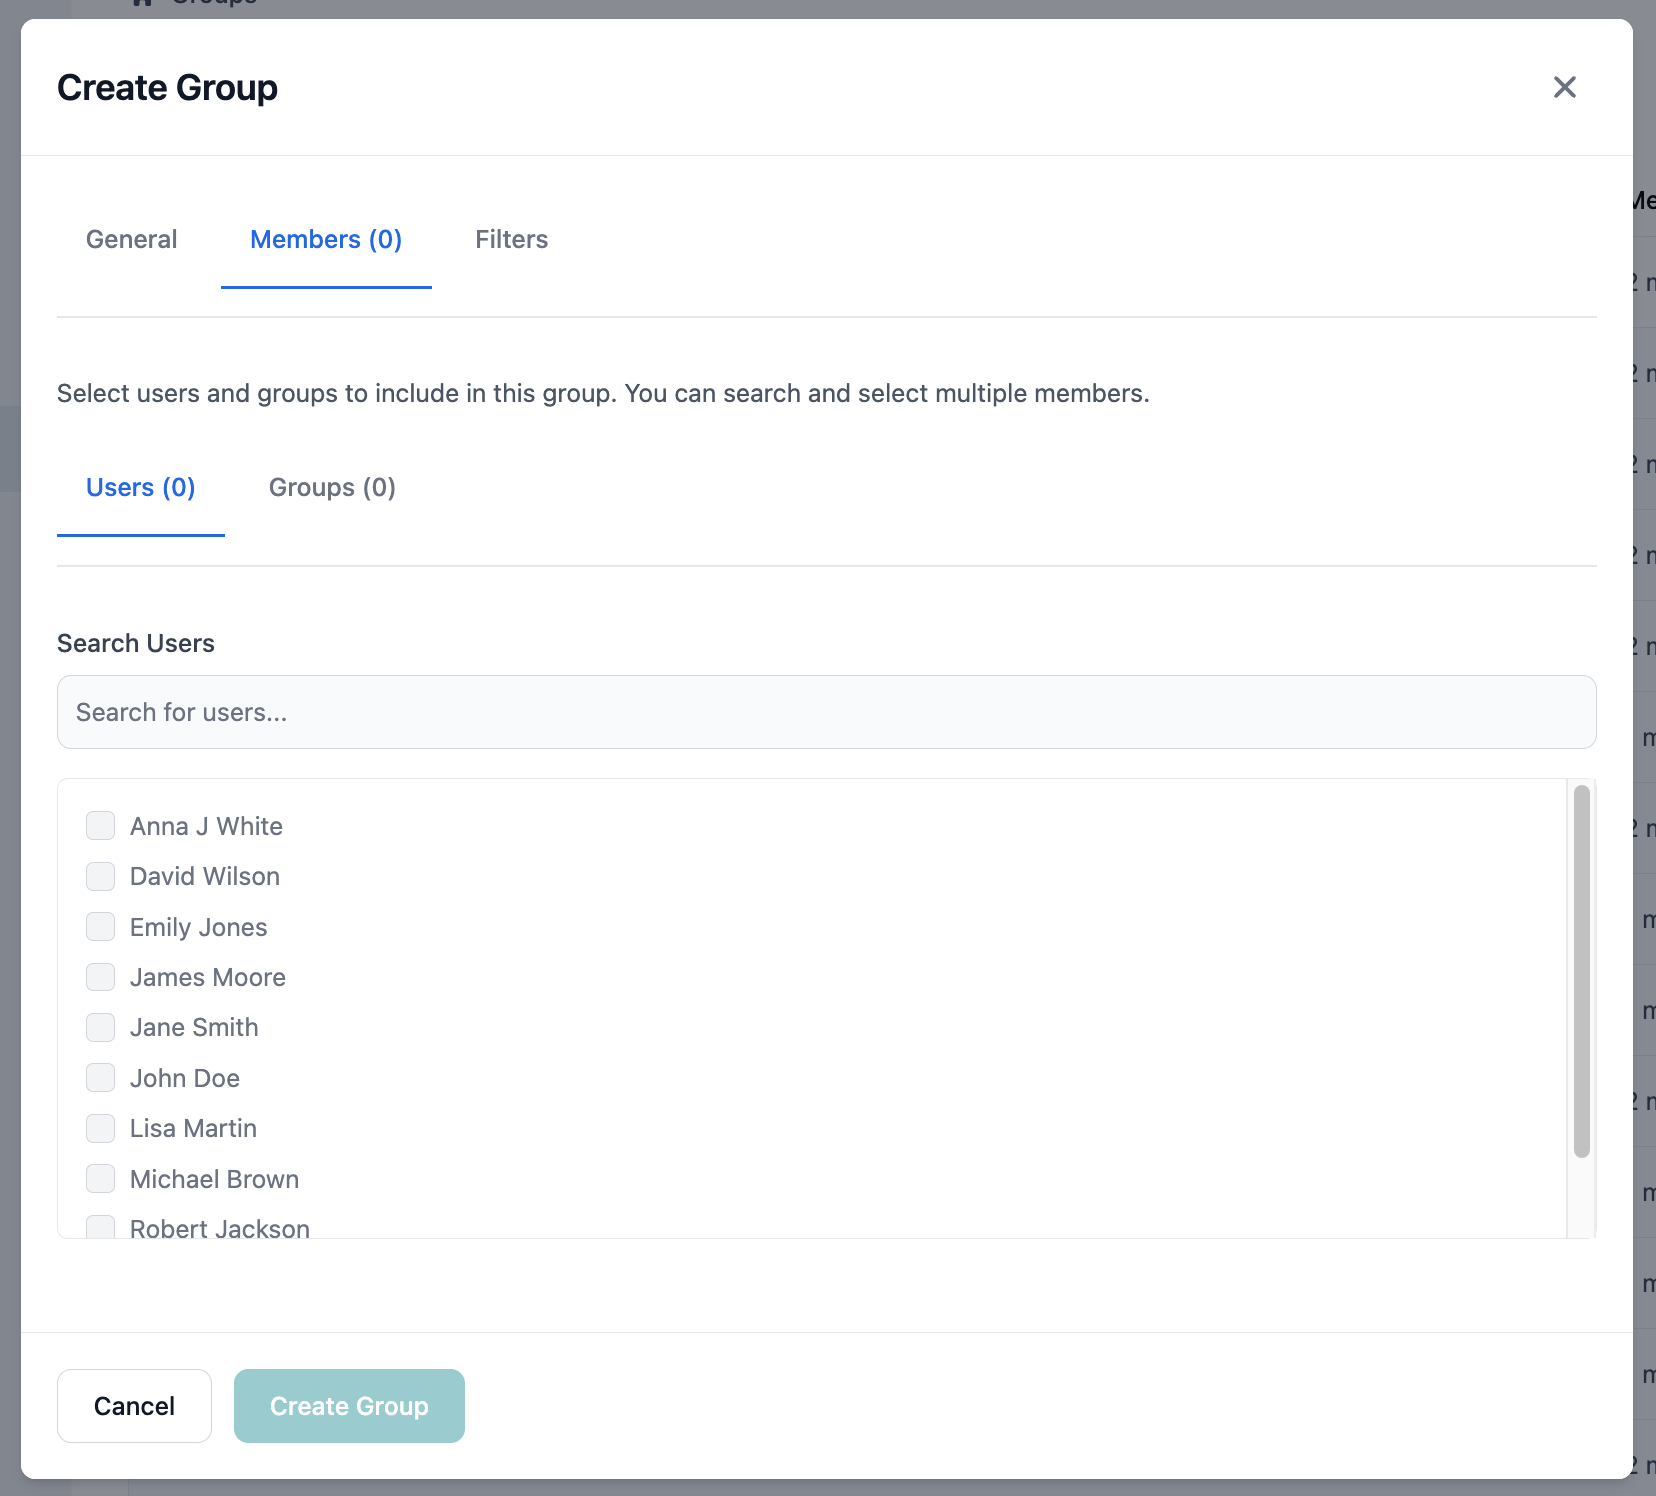
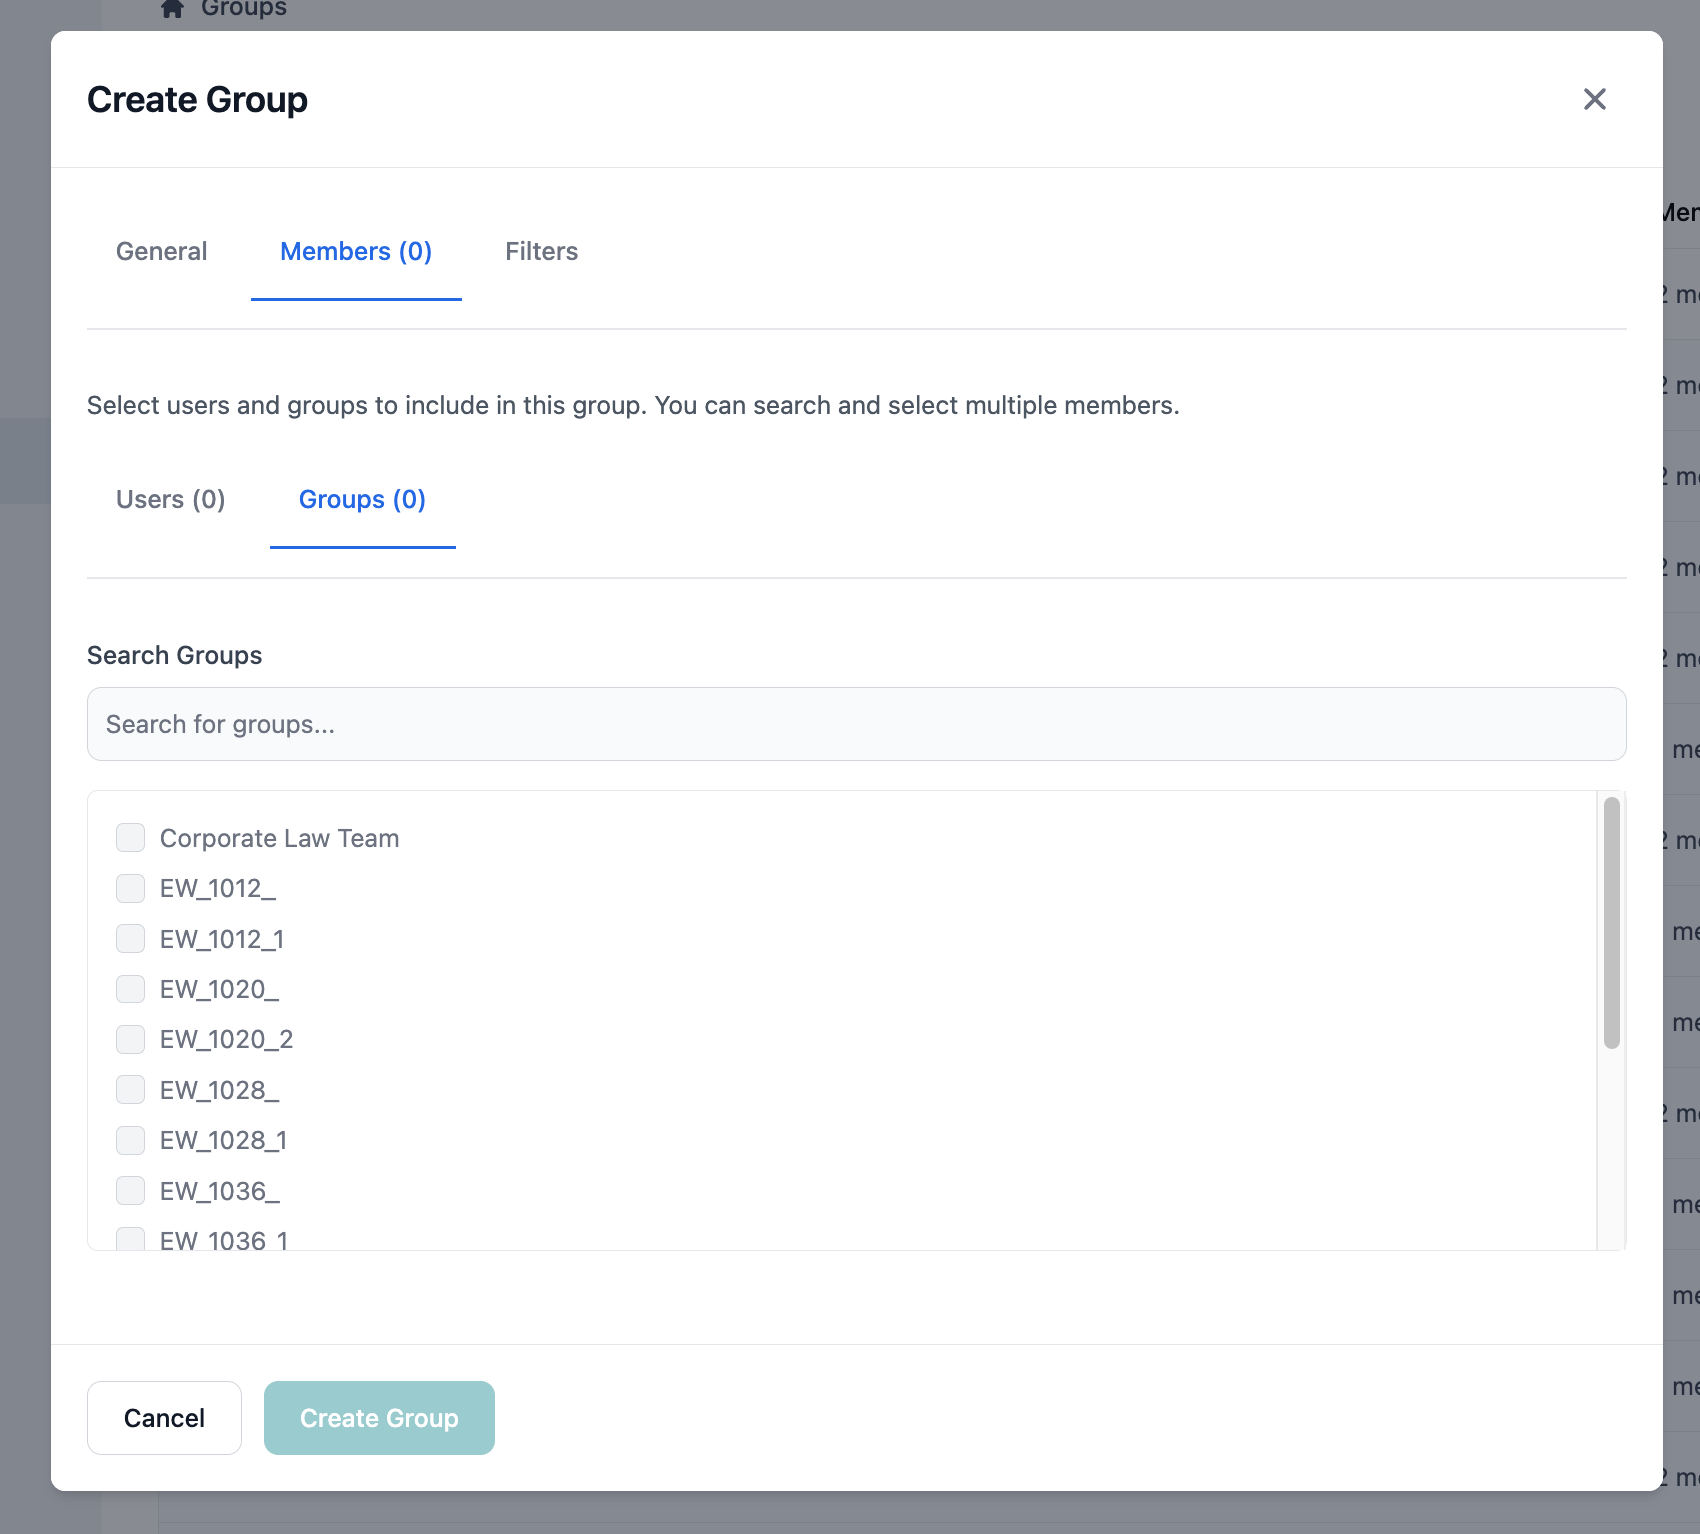
Step 4: Configure Membership
The Members modal provides three methods for defining membership:Users Tab - Static User Selection
- Click the Users tab
- Browse or search for users
- Check boxes next to users to include
- Selected users appear with checkmarks
- Use pagination for large user lists
Groups Tab - Include Other Groups
- Click the Groups tab
- Search for existing groups to include
- Select groups whose members should inherit access
- Nested group members automatically included
Membership Filters Tab - Dynamic Membership
- Click the Membership Filters tab
- Click Add Filter Condition
- Configure the filter:
- Select attribute (Department, Role, Location, etc.)
- Choose operator (equals, contains, starts with, etc.)
- Enter comparison value
- Add multiple conditions with AND/OR logic
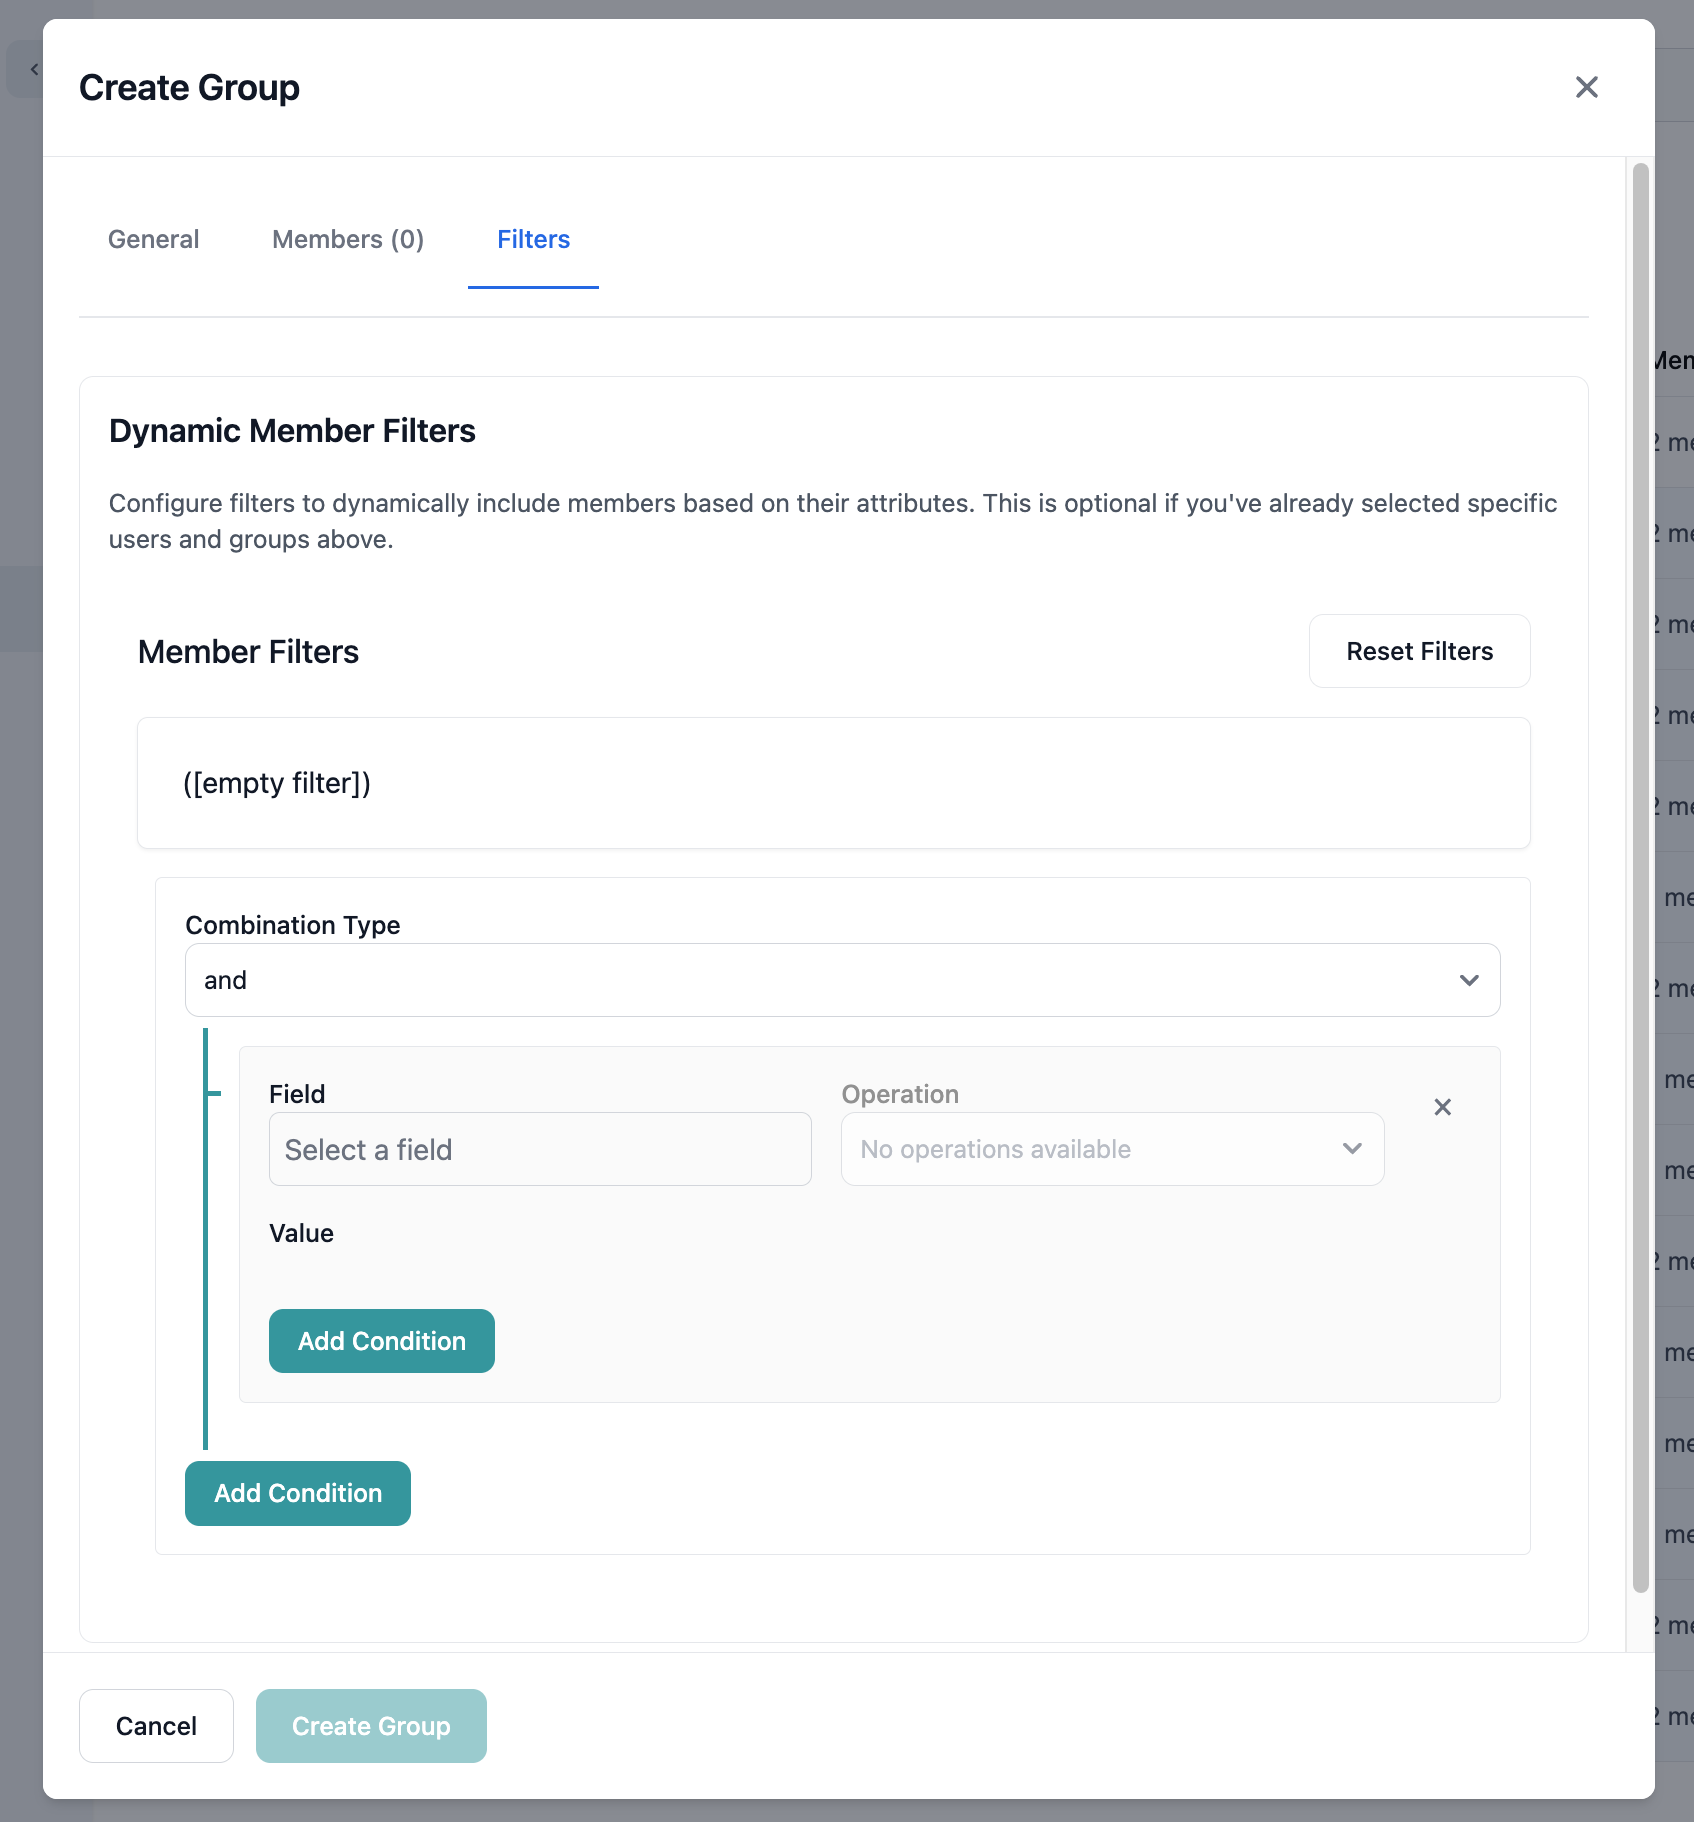
Department equals "Legal"Role contains "Manager"Location in ["New York", "Boston"]StartDate after "2024-01-01"
Step 5: Save the Group
- Review all selected members and filters
- Click Save to create the group
- Monitor save progress:
- Compiling → Validating → Syncing
Viewing Group Details
Click on any group row to view details: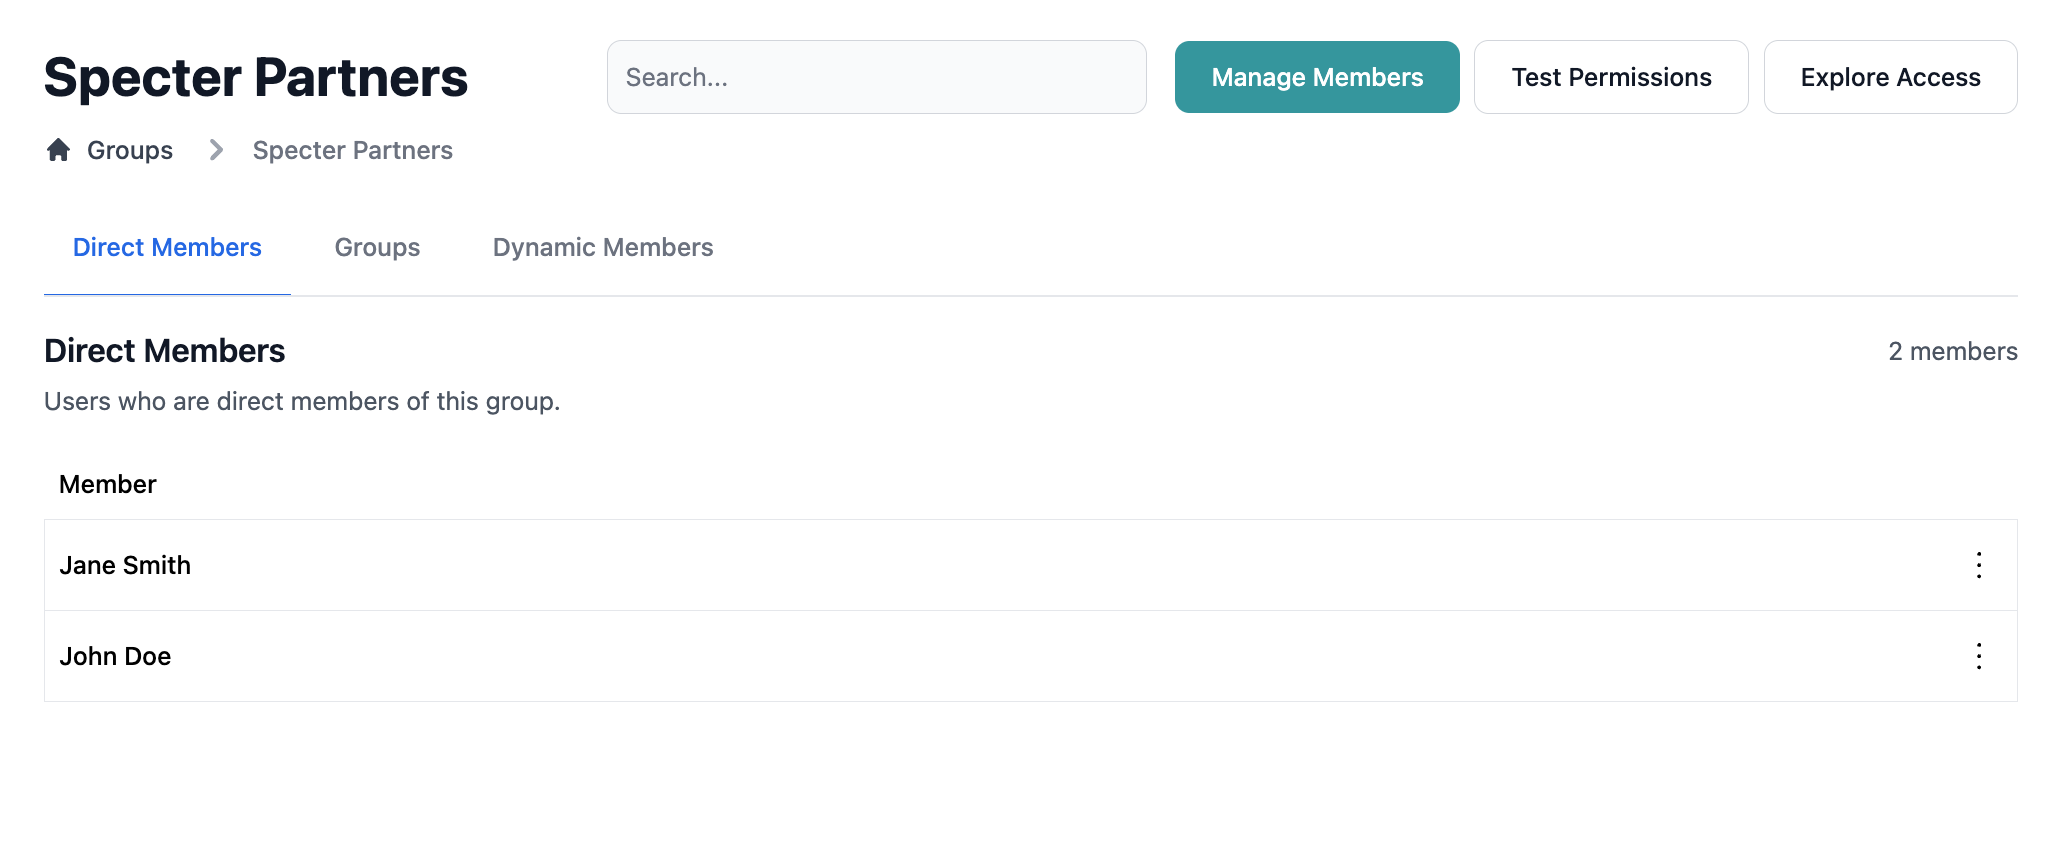
- Group metadata (name, description, source)
- Current member count
- Creation and modification information
- Action buttons (available only for system groups)
- Source indicator (System, Aderant, Intapp, etc.)
Viewing Group Members
Member List
Click on a group to see its members:- Navigate to
/access-control/groups/{groupId} - View the complete member list
- See member details:
- Member type (Direct Members/Groups/Dynamic Members)
- Name
Understanding Membership Sources
Members can be part of a group through:Explicitly selected in the Users tab
Member of an included subgroup
Automatically included by matching filter criteria
Editing Groups
Modifying Group Settings
To edit a system group:- Click on the group row in the table
- Click Edit in the detail view
- The Edit Group modal opens
- Modify settings as needed:
- Update name or description
- Click Save to apply changes
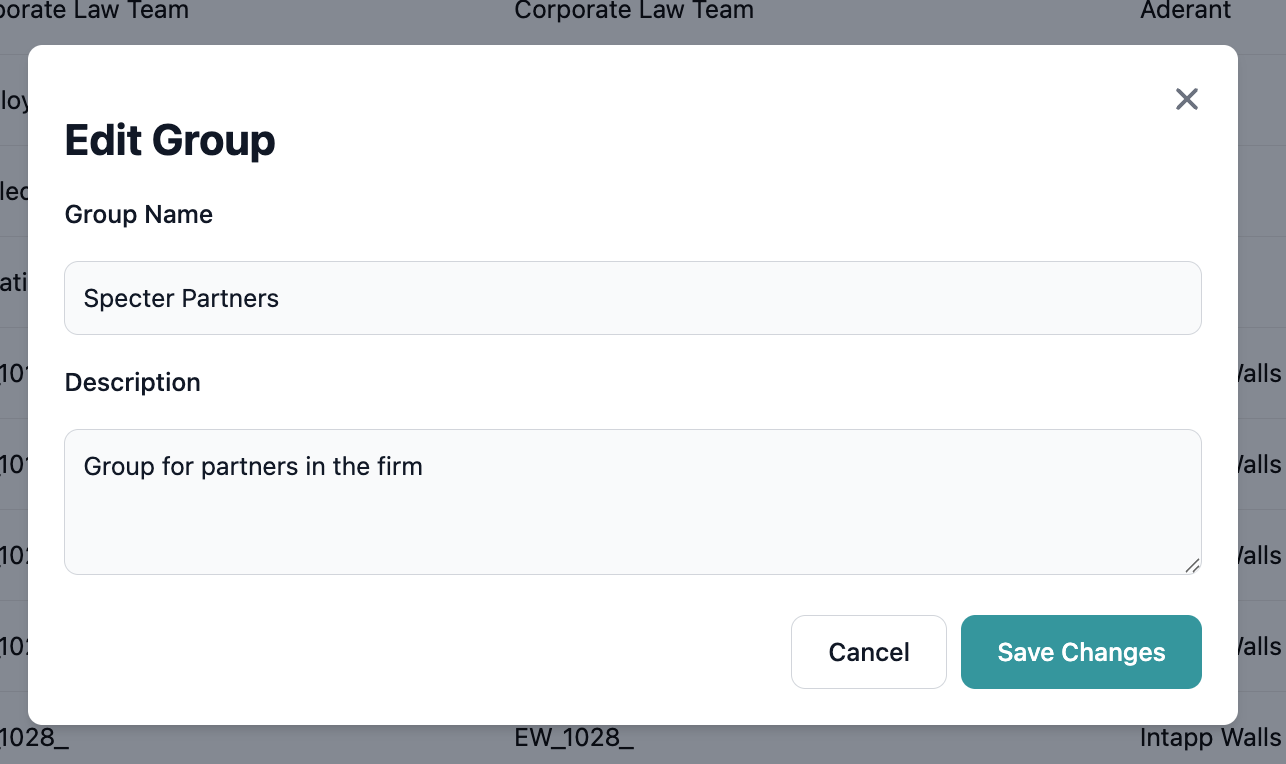
When editing a group, existing members and filters are preserved. Changes are additive unless explicitly removed.
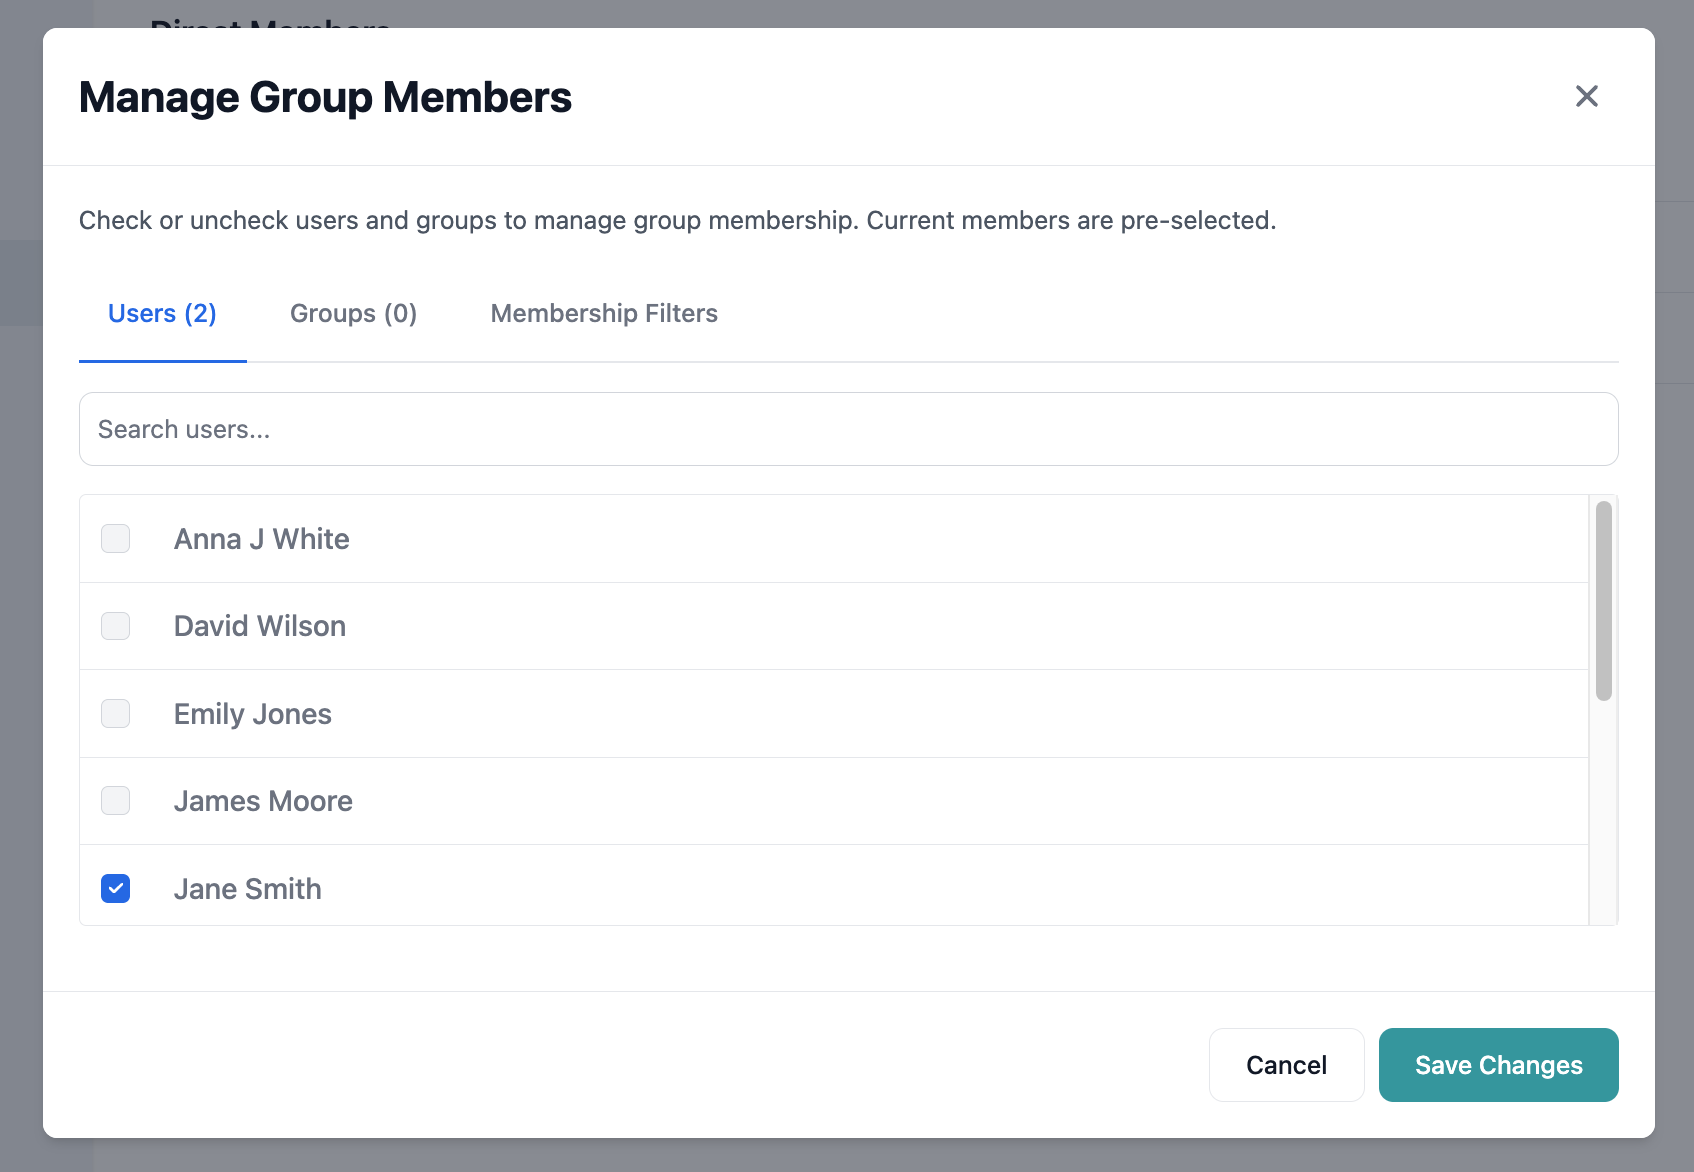
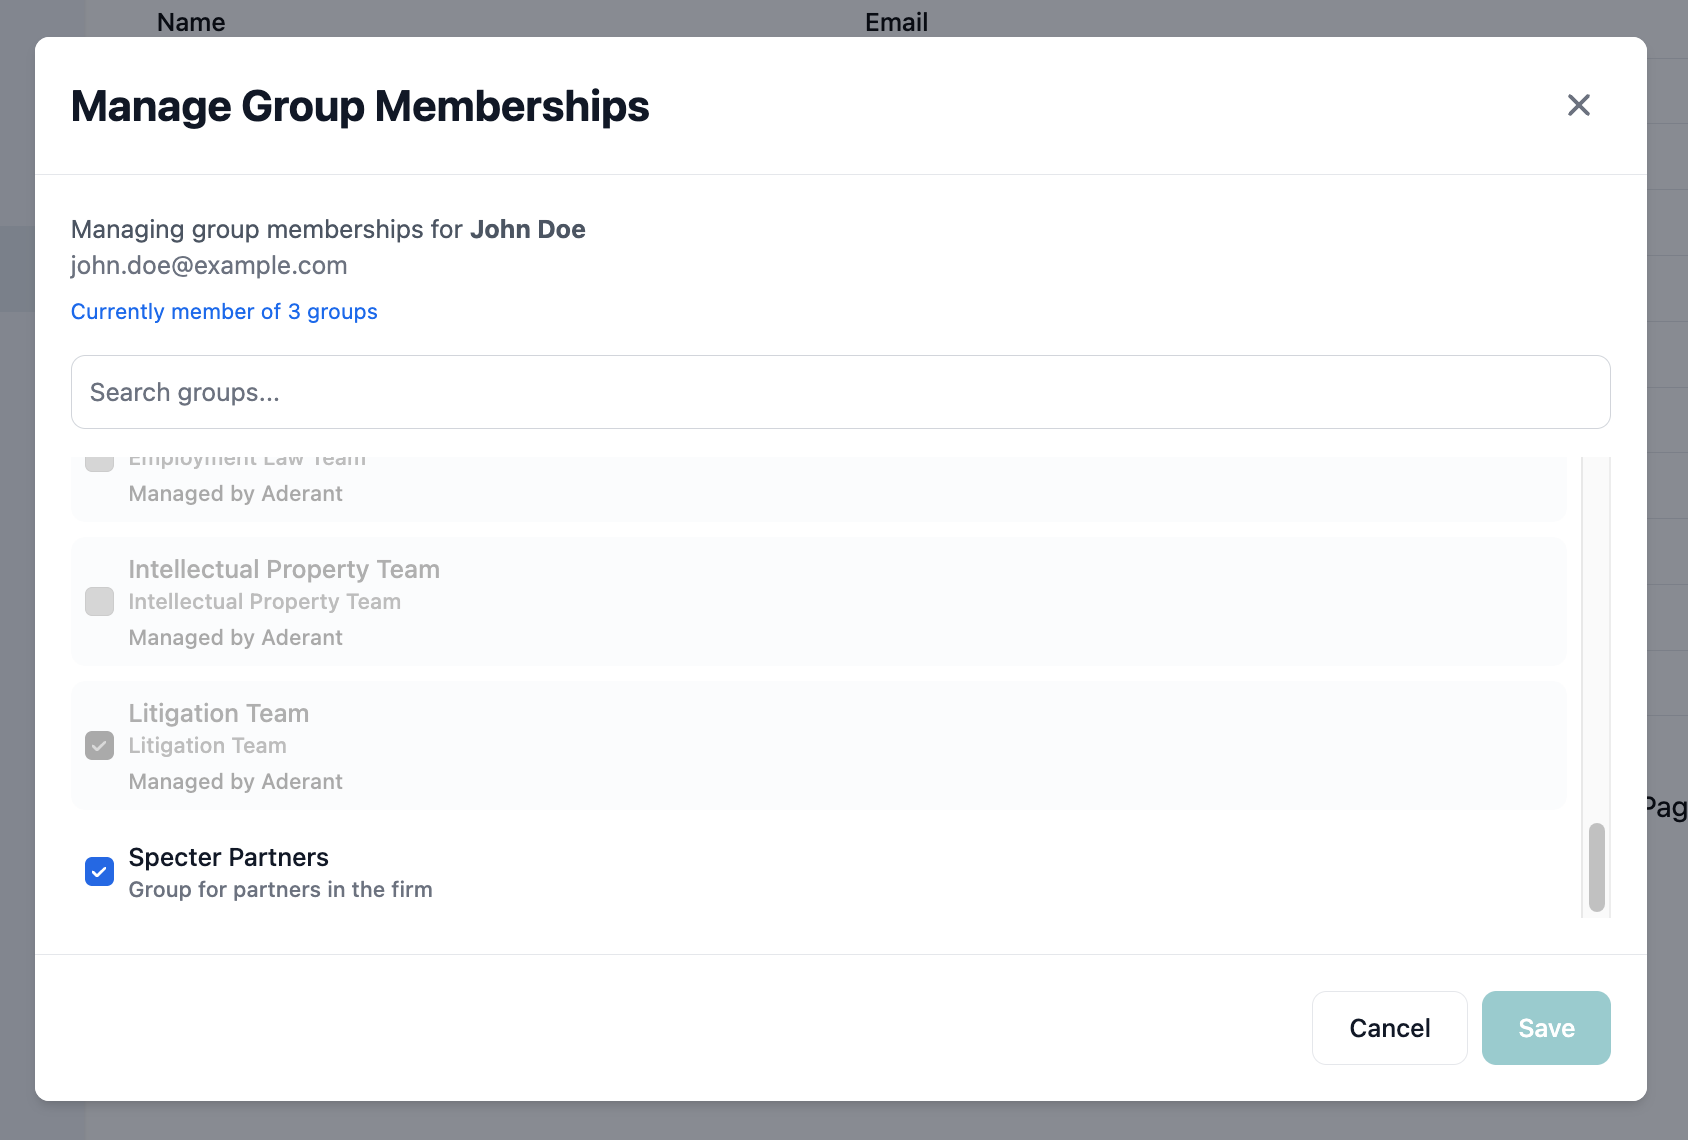
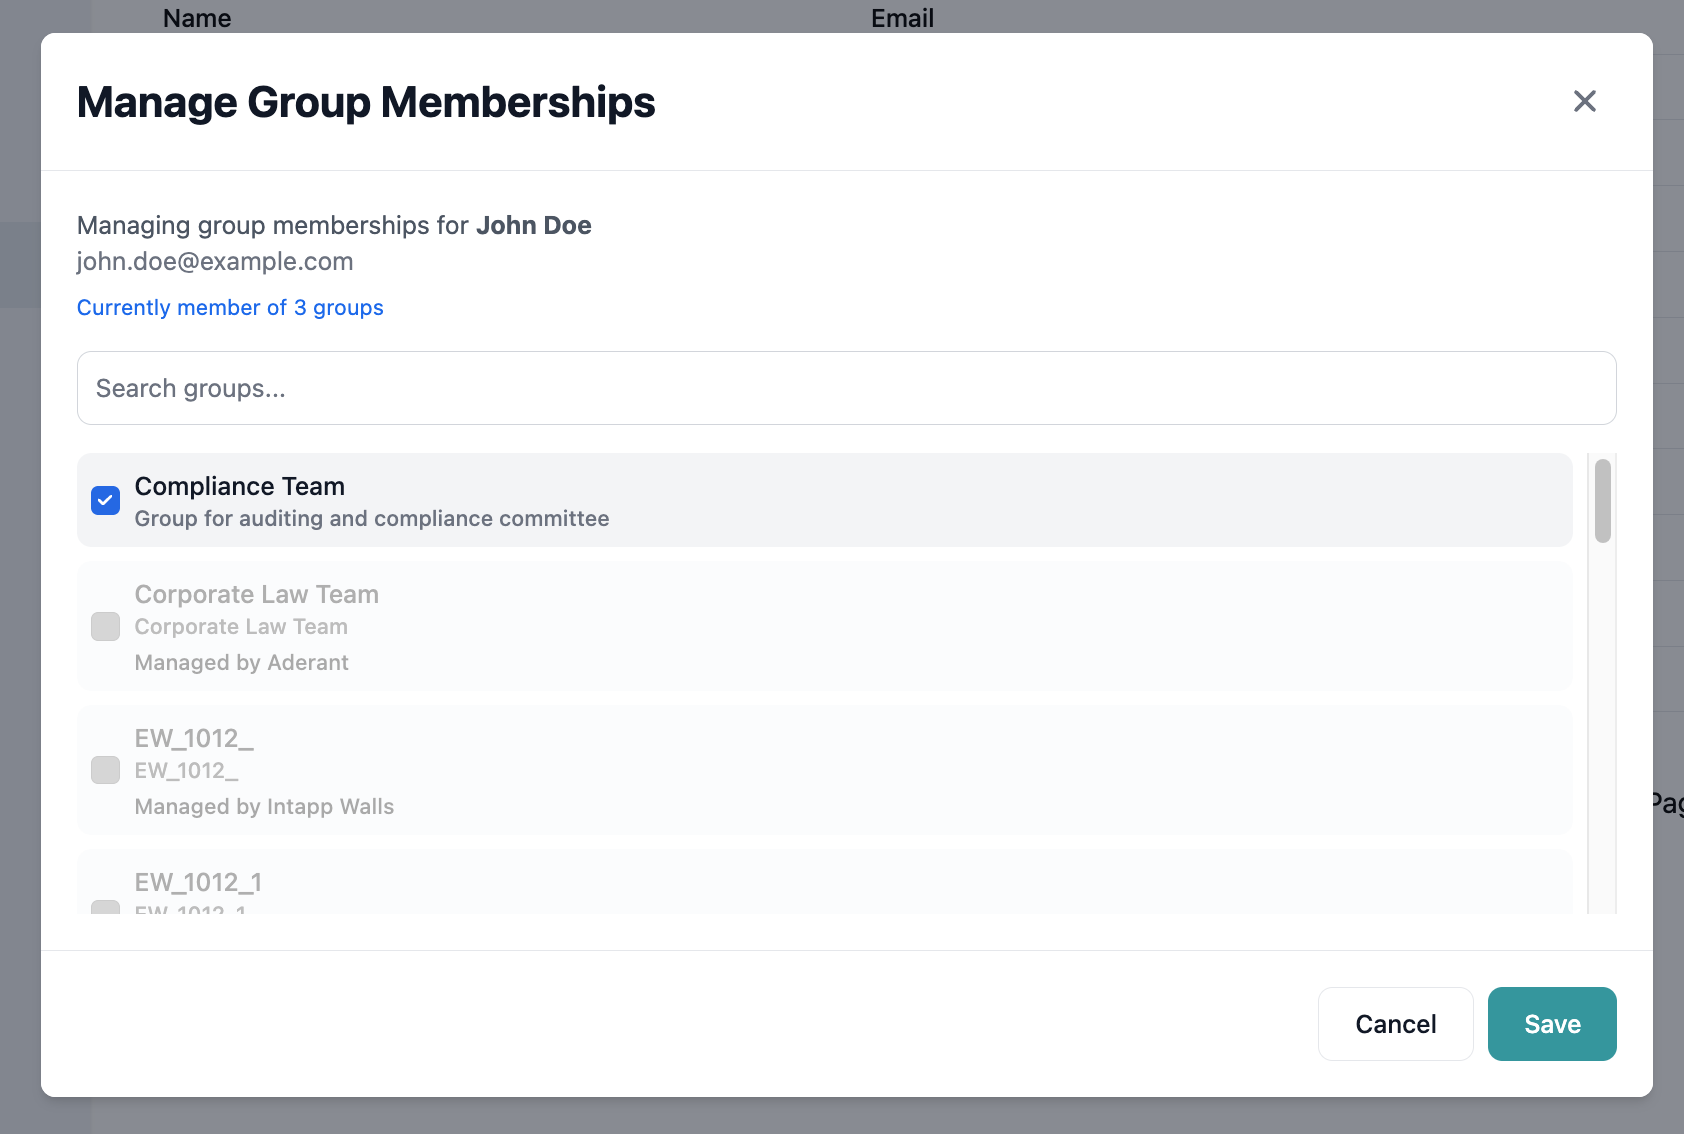
Managing Members
To modify group membership:- Navigate to the group details page
- Click Manage Members button
- The Add Members modal opens with current selections
- Make changes:
- Add new users or groups
- Remove existing members (uncheck)
- Modify filter conditions
- Save changes
Actor Group Membership
Viewing an Actor’s Groups
To see which groups an actor belongs to:- Go to Access Control → Actors
- Click on an actor row
- The Actor Groups modal opens
- View all groups containing this actor
Adding Actors to Groups
From the Actor Groups modal:- Click Add to Groups
- Select groups to add the actor to
- Save changes
- The actor immediately gains group permissions
Deleting Groups
Deletion Process
To delete a system group:- Find the group in the groups table
- Click the Delete action button
- Review the confirmation dialog
- Confirm deletion
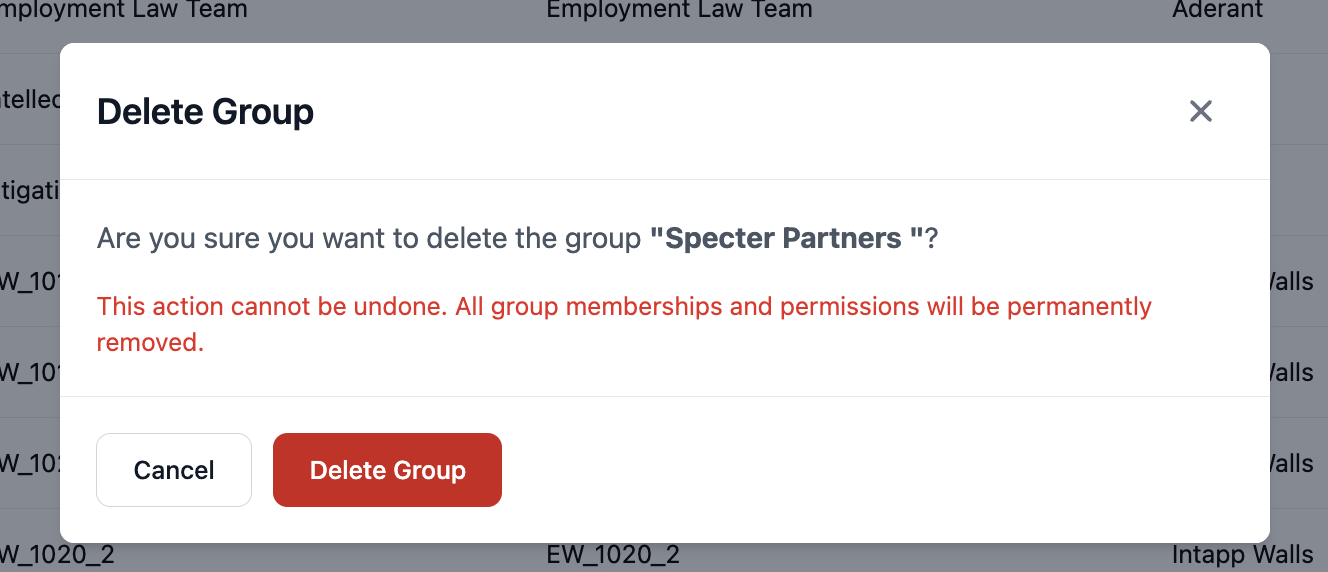
Pre-Deletion Checklist
Before deleting a group:- Check for rules using the group
- Verify alternative access exists if needed
- Document the deletion reason
- Consider disabling instead of deleting
Group Management Best Practices
Naming Strategies
Establish clear naming conventions:- Organizational: “Dept-Legal”, “Dept-Finance”
- Functional: “Role-Partners”, “Role-Associates”
- Project-Based: “Project-Alpha-Team”, “Project-Beta-Reviewers”
- Hierarchical: “Region-NA”, “Region-NA-East”
Organizational Patterns
Dynamic Filter Best Practices
When using membership filters:- Start Simple: Begin with basic filters and add complexity as needed
- Test Thoroughly: Verify filters capture intended members
- Document Logic: Explain filter rules in the group description
- Monitor Changes: Review membership after attribute updates
- Plan for Edge Cases: Consider how filters handle null or missing values
Advanced Group Patterns
Pattern 1: Hierarchical Organization
Create a hierarchy reflecting organizational structure:Pattern 2: Project-Based Groups
Combine static and dynamic membership:- Base group: Project team (static members)
- Filter: Include all managers from participating departments
- Subgroups: Specific role-based access within project
Pattern 3: Compliance Groups
For regulatory compliance:- Restricted group: Users with conflicts (static)
- Cleared group: Users with clearance (static + filtered)
- Monitor group: Compliance officers (filtered by role)
Pattern 4: Temporal Groups
For time-based access:- Summer interns (filter: EndDate > TODAY AND Role = “Intern”)
- Active consultants (filter: ContractEnd > TODAY)
- Probation period (filter: StartDate > TODAY-90)
Monitoring Group Effectiveness
Group Metrics
Track group usage and health:- Member Count: Current number of members
- Growth Rate: Membership changes over time
- Rule Usage: Number of rules referencing the group
- Last Modified: Recent changes indicator
- Empty Groups: Groups with no current members
Membership Auditing
Regular auditing tasks:- Review groups with no members
- Check for duplicate or redundant groups
- Verify filter effectiveness
- Validate nested group relationships
- Confirm external group synchronization
Troubleshooting Groups
Common Issues
User not appearing in group
User not appearing in group
- Verify user matches filter criteria
- Check if user was explicitly excluded
- Allow time for filter evaluation (1-2 minutes)
- Verify user exists in the system
Group shows unexpected members
Group shows unexpected members
- Review filter conditions for over-inclusion
- Check nested groups for inheritance
- Verify attribute values in user profiles
- Look for OR conditions that may be too broad
Cannot edit or delete group
Cannot edit or delete group
- Verify it’s a system group (not external)
- Check your administrative permissions
- Ensure group isn’t locked by another process
- Try refreshing the page
Filter not working correctly
Filter not working correctly
- Verify attribute names are correct
- Check for typos in comparison values
- Test with simpler filter first
- Consider case sensitivity
Integration with Rules
Groups are most powerful when used with access rules:- Create logical groups based on access needs
- Build rules targeting groups instead of individuals
- Maintain groups as organization changes
- Test permissions at the group level
- Create “Legal-Matters-Team” group
- Add legal department members
- Create rule granting access to legal matters
- Assign rule to the group
- New legal team members automatically get access
Next Steps
Create Access Rules
Use your groups in access control rules
Test Group Permissions
Verify group member access works correctly
Explore Actor Access
See how group membership affects individual access
Configure Defaults
Set baseline permissions for your entities